Western Blot Protocol: Complete Step-by-Step Guide

Overview of Western Blotting

Western blotting, also known as immunoblotting, is a core method in molecular biology for detecting specific proteins within a complex sample. Developed in 1979 by W. Neal Burnette, Western blotting—also called immunoblotting—is a widely used method for detecting specific proteins in a sample. Adapted from earlier blotting techniques, it remains a standard in molecular biology. The process involves separating proteins by gel electrophoresis, transferring them to a membrane such as PVDF membranes or nitrocellulose, and using antibodies for detection.

Western blotting is commonly used to confirm protein expression and post-translational changes. It plays a key role in research and diagnostics, including HIV detection and studies of cancer and neurodegenerative diseases. Its reliability makes it essential in protein analysis workflows. Researchers often start with cell culture experiments and prepare extracts using cell lysis buffers containing protease inhibitor cocktail and phosphatase inhibitors to preserve protein integrity before analysis.

Western Blot Workflow Overview

Western_blot_protocol_image

Want CRO Long term partner?

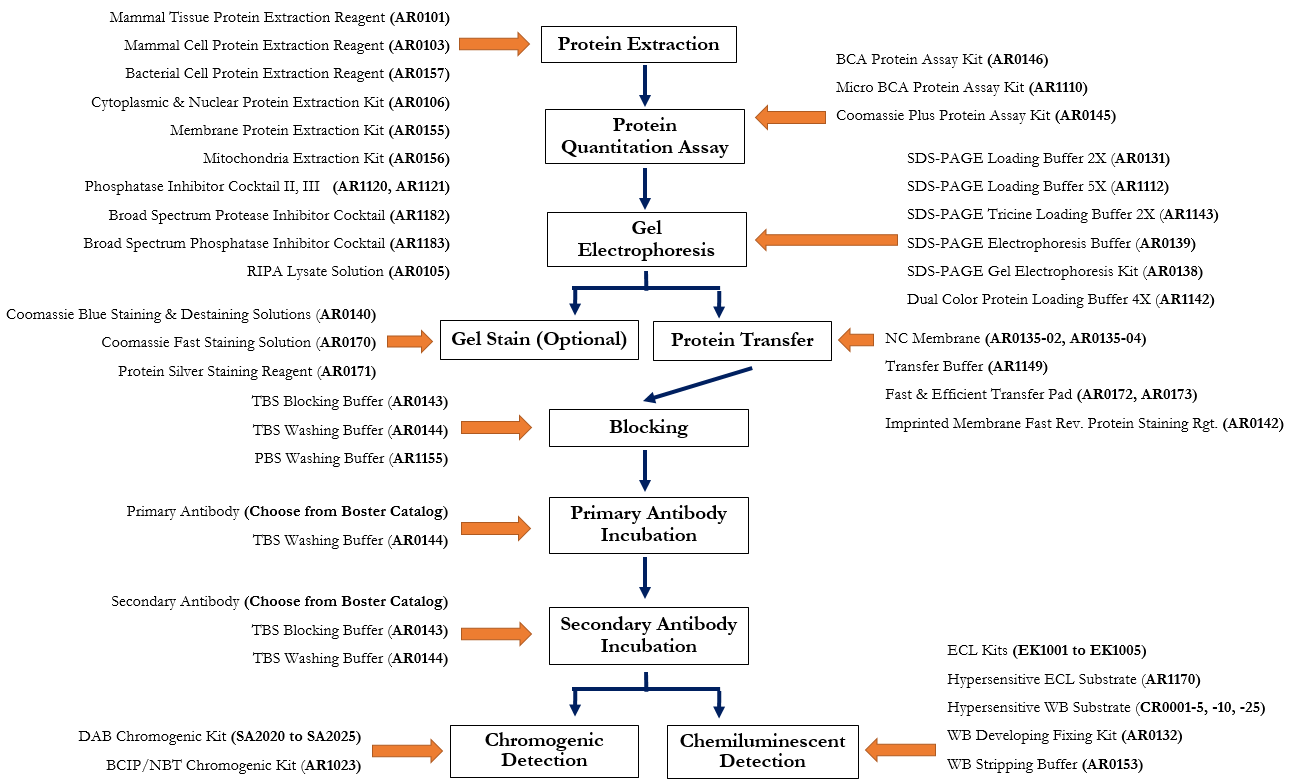
Let Bosterbio handle your Western blot CRO services and be your long term partner in broadening the bandwidth of your lab/team in a flexible manner.

Step 1: Electrophoresis

(A) Gel Preparation

The first step of gel preparation is to determine the gel percentage based on the molecular weight of your protein sample:

Protein Size (kDa) >100 30-100 10-30 <10
Gel Percentage 8% 10% 12% 15%

If you are not sure of the size of your protein or are looking at proteins of a variety of molecular weights, then a gradient gel may provide the best resolution.

Notes

  • We recommend using the SDS-PAGE Gel Preparation Kit available from us (Boster Catalog # AR0138). It contains most of the reagents for the gel preparation and can be used to make both SDS-PAGE gel and non-native PAGE gel.
  • Many protocols are available for gel preparation. Please refer to the manufacturer’s guidelines for use of specific products.
  • Pre-cast gels may also be used instead of making your own gel.

(I) Resolving Gel Preparation

  1. Determine the volume needed and gently mix the ingredients for the chosen percentage of the resolving gel. Make sure to blend the solution gently to avoid too much oxygen from entering the solution.
  2. Pour the gel solution slowly into your gel casting form.
  3. Layer the top of the gel with distilled water to prevent oxygen from entering the gel.
  4. Incubate at 37°C for 30-60 minutes for the gel solution to fully polymerize until it becomes solid.
  5. Remove the water from the polymerized resolving gel (absorb excess with paper towel).

(II) Stacking Gel Preparation

  1. Determine the volume needed, gently mix the ingredients, and absorb water on the solid resolving gel with a filter.
  2. Slowly pour the stacking gel solution on top of the running gel.
  3. Carefully insert the sample comb to avoid bubbles. There should be no bubbles between the comb teeth.
  4. Incubate at 37°C for 30-60 minutes. When the gel solution is fully polymerized and solid, gently take out the comb.

(B) Pre-electrophoresis Sample Preparation

  • Mix the extracted protein sample with 4X Dual Color Protein Loading Buffer (Boster Catalog # AR1142) at 3:1 ratio (i.e. add 300µg sample to 100µL loading buffer).

    Dual Color Protein Loading Buffer is designed to prevent protein degradation during sample heating prior to electrophoresis and is able to work against pH changes during SDS-PAGE run. Many proteins are sensitive to pH changes that result from temperature fluctuations of Tris buffers during electrophoresis. It contains two tracking dyes: blue (Bromophenol Blue) for tracking the progress of electrophoresis and pink (Pyronin Y) for monitoring protein transfer to the membrane. Refer to the datasheet on our website for more information.

  • You may also use one of the following reagents/methods instead of the Dual Color Protein Loading Buffer:
    • SDS-PAGE Protein Loading Buffer 2X (Reducing) (Boster Catalog # AR0131) at 1:1 ratio (i.e. add 100µg sample to 100µL loading buffer)
    • SDS-PAGE Protein Loading Buffer 5X (Reducing) (Boster Catalog # AR1112) at 4:1 ratio (i.e. add 400µg sample to 100µL loading buffer)
    • Tricine SDS Sample Buffer 2X (Boster Catalog # AR1143) at 1:1 ratio (i.e. add 100µg sample to 100µL loading buffer) if the protein with low molecular weight (<10KD)
    • Laemmli 2X Buffer (4% SDS, 10% 2-mercaptoethanol, 20% glycerol, 0.004% bromophenol blue, 0.125 M Tris-HCl; pH 6.8) at 1:1 ratio (i.e. add 100µg sample to 100µL loading buffer)
  • Denature the sample/loading buffer mixture in a 100°C water bath for 5 minutes (or follow the manufacturer instructions). Alternatively, the mixture can be stored in aliquots at -20°C for several months or at 4°C for 1-2 weeks before use.

(C) Loading Samples & Running Electrophoresis

  1. Place the gel in the electrophoresis apparatus.
  2. Fill both buffer chambers with SDS-PAGE Electrophoresis Buffer (25 mMTris base, 190 mM glycine and 0.1% SDS; pH 8.3). We recommend using our buffer (Boster Catalog # AR0139). Fill both buffer chambers with SDS-PAGE Electrophoresis Buffer (25 mMTris base, 190 mM glycine and 0.1% SDS; pH 8.3) to a level above the sample loading well between the two-layer glass pane. Ensure the bottom of the gel is immersed in the loading buffer and the liquid level inside the two-layer glass pane is higher than the outside level. We recommend using our buffer (Boster Catalog # AR0139).
  3. Carefully remove the well-creating comb from the gel and rinse the wells with the electrophoresis buffer.
  4. Pipette your samples into the wells quickly to prevent possible sample diffusion inside the well. As an example, for a well that can contain maximum 30 µL, load 20 to 25 µL of 1 µg/µL sample per well.
  5. Pipette 10 µL of appropriate controls and/or molecular weight standards in separate well(s). The loaded samples should include the treated sample, tissue and cell sample protein for positive control, recombinant protein for positive control, and the marker.
  6. Properly connect the anode and cathode of the electrophoresis.
  7. Turn on the power to run electrophoresis at 100-130V* until the bromophenol blue dye reaches the gel bottom (this can take 1.5 to 3 hours). You should observe fine bubbles from the gel apparatus bottom as this observation indicates that sufficient electric current is generated.
  8. Turn off the power when the protein samples have finished migrating in the gel.
Notes:
  • To prevent sample diffusion, try to shorten the amount of time it takes to load samples as much as possible.
  • In a discontinuous system, the electrophoresis voltage for stacking gel (70-80V) is lower than that for resolving gel (90-110V) to ensure that proteins are concentrated on the same level before running into the resolving gel.
  • *The applied voltage should be adjusted according to the gel thickness, power supply used, and resolution desired.

Step 2: Protein Transfer (To Membrane)

(A) Gel Staining (Optional)

After electrophoresis, we recommend using one of our gel staining solutions to determine if the electrophoretic separation worked. Please refer to the datasheet(s) on our website for more information.

  • Coomassie Blue Staining & Destaining Solution (Boster Catalog # AR0140)
  • Coomassie Blue Fast Staining Solution (Boster Catalog # AR0170)
  • Silver Stain Kit (Boster Catalog # AR0171)

Note: Stained gel cannot be used in the subsequent protein transfer procedure.
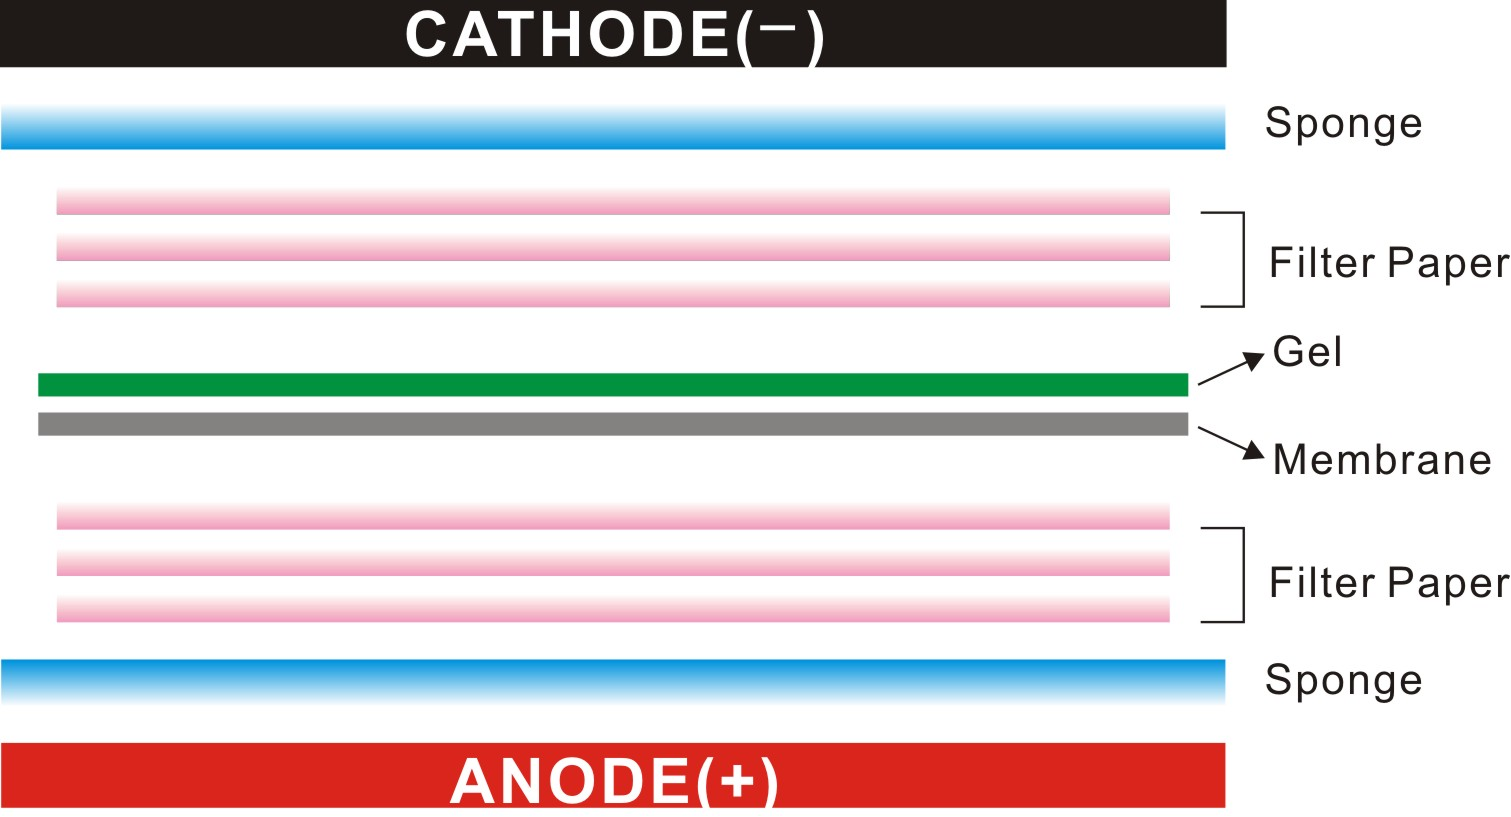
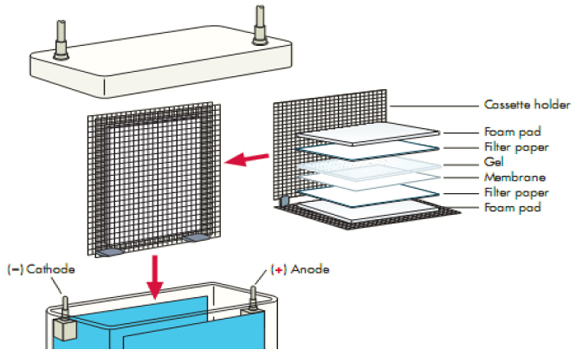
(B) Wet Transfer

  1. Blotting Membrane Preparation
    • Cut the blotting membrane (NC or PVDF) according to the size of your gel (Tips: Cut a good supply of membranes in advance! Store in a cool, dry place).
    • Carefully mark the membrane orientation by cutting a corner or marking it with a pencil.
    • Soak the membrane in methanol for 1 minute.
    • Immerse the membrane for 5 minutes in 1X transfer buffer (25 mMTris base, 190 mM glycine and 20% methanol; pH 8.3) (Boster Catalog # AR1149). Rock the membrane gently until it sinks and water no longer beads up on the surface.
western blot cathode anode
  1. Transfer Cassette
  1. Protein Transfer Run
    • Fill the transfer tank with an adequate amount of 1X transfer buffer.
    • Firmly insert transfer cassette into the slot of the transfer apparatus.
    • Place the lid on top of the transfer tank and make sure the electrodes are lined correctly. The gel should be closer to the cathode and the membrane should be closer to the anode. Negatively charged proteins will migrate towards the anode.
    • Set power source to constant voltage and operate at 25V for 30 minutes*.
    • Check the protein transfer efficiency by membrane staining: Place NC membrane in Ponceau S staining (0.2% w/v Ponceau S; 5% glacial acetic acid) or our Ponceau S Solution (Boster Catalog # AR0142) for 5-10 minutes. A visible red band will appear. The membrane may be de-stained completely by repeatedly washing in wash buffer.
western blot protein transfer
Notes
  • The transfer can be completed overnight at a lower voltage (e.g. 10V).
  • Constant current of 150-300mA is usually applicable. Transfer time and voltage should be optimized according to the gel concentration. Higher gel concentration requires additional time.

Step 3: Membrane Blocking

After transfer, membranes must be blocked to reduce background. Washing steps typically include buffers like Tris Buffered Saline or Phosphate Buffered Saline supplemented with Tween 20.

  • Rinse the blotting membrane 3 times using TBS Wash Buffer (20 mMTris, pH 7.5; 150 mMNaCl; 0.05% Tween 20) (Boster Catalog # AR0144) at room temperature for 10 minutes each time.
  • After rinsing, immerse the blotting membrane in TBS Blocking Buffer (5% nonfat dry milk in buffer of 20 mMTris, pH 7.5; 150 mMNaCl) (Boster Catalog # AR0143) and incubate for 1.5-2 hours at room temperature (or overnight 4°C) with shaking. Other blocking agents, such as gelatin or BSA, can also be used. When detecting phosphoproteins or using biotin-based systems, a Blocking Solution without milk proteins is recommended.

Step 4: Antibody Incubation

After blocking, the membrane is incubated with a primary antibody (that binds to the target protein) followed by an enzyme conjugated secondary antibody (HRP- or AP-conjugated secondary antibody).

  • Dilute the primary antibody with the Antibody Diluent Buffer (Boster Catalog # AR1106-2). Follow the antibody protocol from the manufacturer for optimal dilution.
  • Incubate the primary antibody and the membrane at 4°C overnight or for 1-2 hours at room temperature. For the best results, incubation time and antibody concentration may need to be optimized.

Wash the membrane 3 times with the TBS Wash Buffer for 10 minutes each to remove the unbound antibodies.

  • Dilute the secondary antibody with the TBS Blocking Buffer (Boster Catalog # AR0143). Follow the antibody protocol from the manufacturer for optimal dilution.
  • Incubate the secondary antibody and the membrane at 4°C overnight or 1-2 hours at room temperature on a shaker.

Wash the membrane 3-6 times with the TBS Wash Buffer for 10 minutes each to remove unbound antibodies.

Step 5: Signal Detection

Signal detection can be carried out using chemiluminescent, colorimetric, or fluorescent methods. The choice depends on the label or enzyme conjugated to the secondary antibody. Common options include enhanced chemiluminescence (ECL) for high sensitivity and DAB chromogenic substrates for straightforward visualization. Fluorescent detection systems are also increasingly used, especially for multiplex analysis, and are compatible with PVDF membranes.

In this section, we provide the protocols for the Enhanced Chemiluminescence Detection (ECL) and colorimetric detection (DAB) methods. Use the method that fits your preferences and criteria.

(A) Enhanced Chemiluminescence Detection (ECL)

Boster ECL chemiluminescent system depends on incubation of the western blot with a substrate that will luminesce when exposed to HRP on the secondary antibody. The light is then detected and captured by photographic film.

  1. ECL Substrate Preparation
    • Choose the correct ECL kit† according to the species that the primary antibody is raised on.
      Origin of Primary Antibody Species Catalog # of ECL Kit*
      Mouse IgG EK1001
      Rabbit IgG EK1002
      Goat IgG EK1003
      Rat IgG EK1004
      Mouse IgM EK1005

      * Each kit has sufficient reagents for 800 cm2 of membrane.

      † Instead of using the ECL kit which provides 1) chromogenic reagents A and B (20X concentrated; 5 mL), 2) blocking buffer and 3) HRP-conjugated secondary antibody, one may use one of the following standalone chromogenic reagents A and B from Boster:

      Reagent A Reagent B
      Product Conc. Volume Conc. Volume Catalog #
      ECL Western Blotting Substrate 1X** 100 mL 1X** 100 mL AR1170
      Hypersensitive WB Chemiluminescent Substrate 20X 5 mL 20X 5 mL CR0001-5
      Hypersensitive WB Chemiluminescent Substrate 20X 10 mL 20X 10 mL CR0001-10
      Hypersensitive WB Chemiluminescent Substrate 20X 25 mL 20X 25 mL CR0001-25

      ** Ready-to-use

    • Prepare the ECL substrate solution by mixing the following and use the solution within two hours of preparation:
      • 50 µL of 20X Chromogenic Reagent A (Luminol & Luminious Enhancer)
      • 50 µL of 20X Chromogenic Reagent B (Peroxidase & Stabilizer)
      • 1 mL of distilled water
  2. Membrane Treatment
    • Thoroughly cover the membrane with the substrate solution (use 1 mL of solution for 10 cm2 of membrane).
    • Incubate the membrane at room temperature until bands appear (usually 1-5 minutes; incubation time can be estimated in dark room).
    • Gently blot the edge of the membrane on a piece of paper to remove excess any substrate solution.
    • Put a clear preservative film or transparent glass paper over the membrane and remove any air bubbles observed.
  3. Film Development and Fixing

    Record the test result using autoradiography film or CHEMIDOC in a darkroom. For autoradiography film, exposure time for the specific antigen depends on the developing effect, which could range from seconds to minutes.

    Using WB Developing Fixing Kit (Boster Catalog # AR0132), develop and fix the film in a dark room immediately. Alternatively, fluorescence CCD scan, digital imager, or luminometer can be used.

    • Put the X-ray film over the membrane.
    • Develop the film by immersing it in developing solution for 10 seconds to 10 minutes. Determine the exposure time required by observing under red light and stop developing once the film achieves the experimental purpose. Multiple exposures may be necessary for the optimal signal to noise ratio.
    • Wash the film with clean water (to remove the developing solution completely) and stop washing when bands appear.
    • Immerse the film in fixing solution for 3-5 minutes.
    • Wash the film with clean water to remove the fixing solution.
  4. Notes

(B) Colorimetric Detection

Prepare DAB or BCIP/NBT substrate solution described below.

  1. DAB Substrate Preparation (For HRP-conjugated secondary antibodies)
    • Choose the correct DAB kit according to the species that the primary antibody is raised and the desirable color:
      Origin of Primary Antibody Species Color Catalog # of DAB Kit
      Mouse IgG Yellow SA2020
      Goat IgG Yellow SA2021
      Rabbit IgG Yellow SA2022
      Rat IgG Yellow SA2023
      Mouse IgG Blue SA2024
      Rabbit IgG Blue SA2025
    • Prepare the DAB substrate solution by mixing the following:
      • 50 µL of 40X Chromogenic Reagent A (DAB)
      • 50 µL of 40X Chromogenic Reagent B (H2O2)
      • 50 µL of 40X Chromogenic Reagent C (TBS Wash Buffer)
      • 2 mL of distilled water
  2. BCIP/NBT Substrate Preparation (For AP-conjugated secondary antibodies)
    Prepare the BCIP/NBT substrate solution by mixing the following:
    • 50 µL of 20X Chromogenic Reagent A (BCIP/NBT)
    • 50 µL of 20X Chromogenic Reagent B (Tris concentrated buffer, pH 9.4)
    • 1 mL of distilled water
  3. Membrane Treatment
    • Thoroughly cover the membrane with the substrate solution (use 1 mL of solution for 10 cm2 of membrane).
    • Incubate the membrane at room temperature until bands appear (usually 10-30 minutes); incubation for BCIP/NBT should be done in dark.
    • Wash the membrane in distilled water to stop the reaction.
    • Observe the bands and take pictures.

Western Blot Protocol FAQs:

1. How does protein concentration affect Western Blot results?

Protein concentration is critical in Western blotting for accurate protein band quantification. Higher concentrations can lead to oversaturation of bands, while too low concentrations may result in weak signals. It’s essential to optimize protein concentration, often determined via assays like BCA or Bradford, for clear and distinct protein bands on the membrane. When loading, include a molecular weight ladder alongside your samples to verify accurate migration.

2. What is the importance of gentle agitation in the Western Blot protocol?

Gentle agitation during steps such as membrane blocking and antibody incubation ensures uniform coverage and binding. Using a reliable Blocking Buffer or Blocking Solution with agitation prevents uneven backgrounds and non-specific interactions. This leads to reproducible results and improves detection of proteins across different tissue samples and cell culture extracts.

3. Why is the Transfer of Proteins to the Transfer Membrane crucial in Western Blotting?

The Transfer of Proteins from the SDS-PAGE gel to the Transfer Membrane is a key step in Western Blotting. This step ensures that proteins are immobilized on a stable surface (like PVDF or Nitrocellulose membranes) for subsequent probing with antibodies. Efficient transfer is essential for protein detection and analysis, especially those of varying molecular weights.

4. How does the choice of Primary Antibody Solution affect Western Blot outcomes?

The Primary Antibody Solution in Western Blotting is crucial for the specific detection of the target protein. The choice of a primary antibody, including its specificity, affinity, and whether it is polyclonal or monoclonal, can significantly influence the sensitivity and specificity of the blot. Proper dilution and incubation conditions for the primary antibody are also key to optimal results.

5. What role does electrical current play in SDS-PAGE Gel Electrophoresis for Western Blotting?

In SDS-PAGE Gel Electrophoresis, electrical current is essential for protein separation based on molecular weight. An optimal current ensures proteins migrate smoothly through the gel matrix. The voltage needs to be adjusted based on gel thickness and protein size; too high a current can lead to overheating and distorted bands, while too low a current may result in inadequate separation.

Related Pages

Western Blotting Principle

Learn the principle behind Western blotting, including protein separation by SDS-PAGE and target detection through membrane blotting and antibody-based analysis.

Learn More

Western Blot Sample Preparation

Review Western blot sample preparation guidance to help improve protein extraction, handling, and sample quality across different sample types.

Learn More

Western Blot Troubleshooting Tips

Troubleshoot common Western blot issues such as weak signal, incorrect band size, smiling gels, and high background with practical tips.

Learn More

Western Blotting Optimization

Explore Western blot optimization tips for transfer, blocking, antibody incubation, and detection to improve assay performance and consistency.

Learn More

How to Check Transfer Quality in Western Blot

Before you move on to blocking, make sure the membrane is worth taking forward. A Western blot can start failing long before the antibodies ever touch the membrane.

Learn More

Which Membrane Should You Choose for Western Blot

PVDF or Nitrocellulose? A practical guide to choosing the right membrane based on workflow, reprobing needs, and downstream use.

Learn More

Western Blot Stripping Buffer Protocol

How to Strip and Re-probe Cleanly? A verification-first workflow to prevent ghost bands and high background.

Learn More

Western Blot Quantification

Learn how to quantify Western blot results more reliably by understanding saturation, normalization, and linear-range signal measurement.

Learn More