IHC Protocols

We provide the step-by-step protocols for IHC-P, IHC-F, and ICC/IF to help you improve your assay performance and obtain clear result images.

Boster Protocols for IHC

Standardization is one of the most challenging aspects for the implementation of successful biospecimen staining. In an effort to accelerate your immunostaining of tissue sections and cell climbing slices, we have developed and validated our step-by-step IHC/ICC/IF protocols to cover biospecimen preparation and assay procedures. We believe these protocols will be a useful resource for your staining workflow or at least a good starting point for further protocol optimization if necessary. For each of the protocols, we also provide a summary flow chart with the applicable Boster’s reagents to enhance your product search on our website.

Learn our best IHC protocol practises

Get a unique combination of service quality, subject expertise and cost savings, when it comes to IHC service.

IHC-Paraffin (IHC-P) Workflow Overview

Boster manufactures IHC reagents that are used in our own validation processes. See the IHC protocol below with available Boster products highlighted.
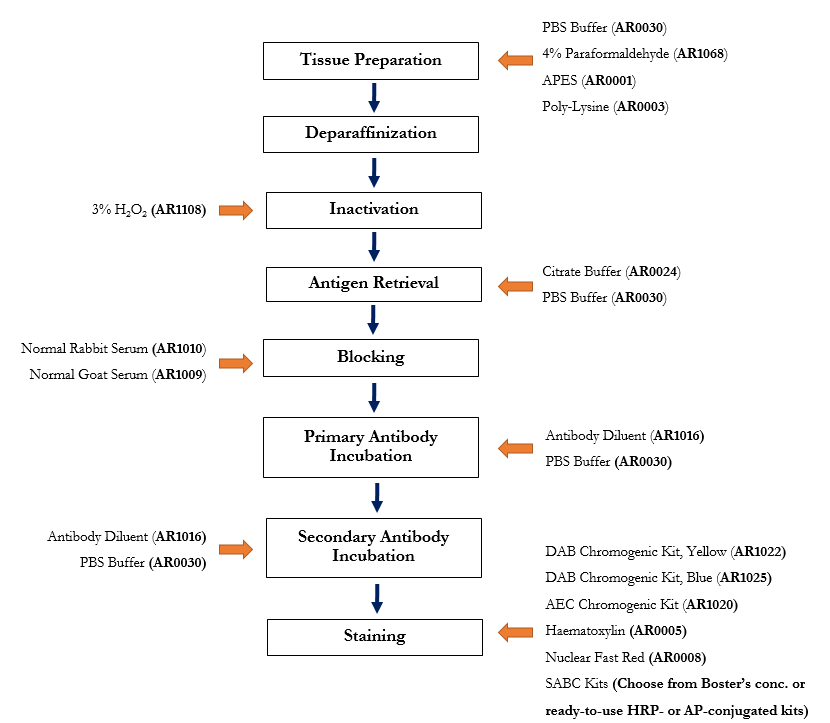
IHC Workflow (Paraffin-Embedded Sections) with Applicable Boster Reagents

Boster IHC Reagents

You can save up to 90% on the above reagents if you buy them from Boster Bio

IHC-P Protocol Details

Step-by-step guide for IHC-P protocol with reagent recommendations

  • Tissue Preparation

    Used Products: PBS Buffer , 4% Paraformaldehyde

    • Harvest fresh tissue and place it in a dish filled with ice-cold PBS buffer
    • Wash the tissue thoroughly with PBS to remove blood (Use forceps to remove connective tissues)
    • Cut the tissue into slices of thickness of 3 mm or less
    • Immerse the slices in 4% Paraformaldehyde at room temperature for 8 min
    • Immerse the slices in 4% Paraformaldehyde (pre-cool at 4°C) for 6 to 7 hrs. The paraformaldehyde volume should be 20X greater than the tissue volume by weight
    • Wash the tissue 3X with PBS (1 min each)
    • Dehydrate the tissue by immersing the tissue sequentially as follows:
      • 1X into 80% ethanol (1 hr at 4°C)
      • 1X into 90% ethanol (1 hr at 4°C)
      • 3X into 95% ethanol (1 hr each at 4°C)
      • 3X into 100% ethanol (1 hr each at 4°C)
      • 3X into dimethylbenzene (0.5 hr each at room temperature)

    • Prepare the first portion of liquid paraffin in a suitable bath and allow the paraffin to reach and maintain at 60°C
    • Immerse the tissue 2X into the paraffin bath (2 hrs each)
    • Prepare the second portion of liquid paraffin in a suitable bath and allow the paraffin to reach and maintain at 60°C
    • Pour the second portion of paraffin into a mold
    • Quickly transport the tissue from the paraffin bath to the mold with paraffin
    • Incubate the tissue at room temperature until it coagulates
    • Store the tissue at 4°C

    • Secure the paraffin section on slicer
    • Slice one to two pieces of section to adjust the slicer so that the section and blade are parallel
    • Slice the remaining section carefully with ~5 µm thick
    • Incubate the sliced section in 40 to 50°C water to unfold
    • Mount the tissue section onto Poly-Lysine or APES coated glass slides
    • Incubate the slides overnight at 37°C

    Note: This fixation procedure using paraformaldehyde and formalin fixatives may cause autofluorescence in the green spectrum. In this case, you may try fluorophores in the (i) red range or (ii) infrared range if you have an infrared detection system.

  • Dewaxing/Deparaffinization

    Prepare the following reagents:

    • 90% dimethylbenzene
    • 95% dimethylbenzene
    • 100% dimethylbenzene
    • 90% ethanol
    • 95% ethanol
    • 100% ethanol

    Sequentially immerse paraffin sections into:

    • 90% dimethylbenzene (for 7 min)
    • 95% dimethylbenzene (for 7 min)
    • 100% dimethylbenzene (for 7 min)
    • 90% ethanol (for 7 min)
    • 95% ethanol (for 7 min)
    • 100% ethanol (for 7 min)
    • Wash the slides with water to remove ethanol

    Note: The process of dewaxing should be done in a fume hood at room temperature in summer. When the temperature is lower than 18°C, it is recommended to dewax at 50°C

  • Inactivation

    Used Products: 3% Hydrogen Peroxide

    • Immerse dewaxed paraffin section into the 3% H2O2 at room temperature for 10 min
    • Wash the section 3X to 5X with distilled water (total 3 to 5 min)
  • Antigen Retrieval (Heat Induced Epitope Retrieval: HIER)

    Used Products: Citrate Buffer Powder , PBS Buffer

    • Immerse the paraffin sections in citrate buffer
    • Heat the buffer in microwave and turn it off when the buffer has boiled
    • Keep the boiled buffer in microwave for 5 to 10 min
    • Repeat the heating as outlined above 1X to 2X
    • Cool the slides until it reaches room temperature
    • Wash the sections 1X to 2X with PBS
    • Problems encountered in this step can result in a weak signal. Find out how you can troubleshoot the antigen retrieval protocol here.
    Read on how you can effectively select the right antigen retrieval method
  • Blocking

    Used Products: Normal Rabbit Serum

    • Add 5% BSA blocking solution or normal goat serum to the HIER treated samples
    • Incubate the samples at 37°C for 30 min
    • Discard extra liquid (No washing required)
  • Primary Antibody Incubation

    Used Products: Antibody Diluent , PBS Buffer

    • Dilute primary antibody with antibody diluent to the concentration recommended by the antibody manufacturer
    • Add the diluted antibody to the samples and incubate overnight at 4℃ or at 37℃ for 1 hour
    • Wash the samples 2X with PBS (20 min each)
  • Secondary Antibody Incubation

    Used Products: Antibody Diluent , PBS Buffer

    • Dilute biotinylated secondary antibody with antibody diluent to the concentration recommended by the antibody manufacturer
    • Add the diluted antibody to the samples and incubate at 37°C for 30 min
    • Wash the samples 2X with PBS (20 min each)
  • Staining

    Used Products: DAB Chromogenic Substrate Kit (Brown) , DAB Chromogenic Substrate Kit (Blue) , AEC Substrate Kit , Hematoxylin , Nuclear Fast Red

    • Add Strept-Avidin Biotin Complex (SABC) HRP- or AP-conjugated reagents to the samples
    • Incubate the samples at 37°C for 30 min
    • Wash the samples 3X with PBS (20 min each)
    • Add a suitable amount of DAB reagent to the samples and incubate in dark at room temperature for 10 to 30 min
    • Monitor the tissue staining intensity under a bright-field microscope*
    • Wash the samples 3X to 5X with distilled water
    • Counterstain (if necessary)
      • Add hematoxylin to the sample
      • Dehydrate
      • Immerse the paraffin sections 2X in dimethylbenzene (7 min each)
    • Check the tissue staining intensity under a bright-field microscope

    *If the staining background is too high, wash the section 4X with 0.01-0.02% TWEEN 20 PBS and 2X with pure PBS after the SABC reaction and before DAB staining. Then use DAB to stain the samples.

    Learn the probable causes and solutions of weak or no staining

IHC-Frozen (IHC-F) Workflow Overview

Boster manufactures IHC reagents that are used in our own validation processes. See the IHC protocol below with available Boster products highlighted.
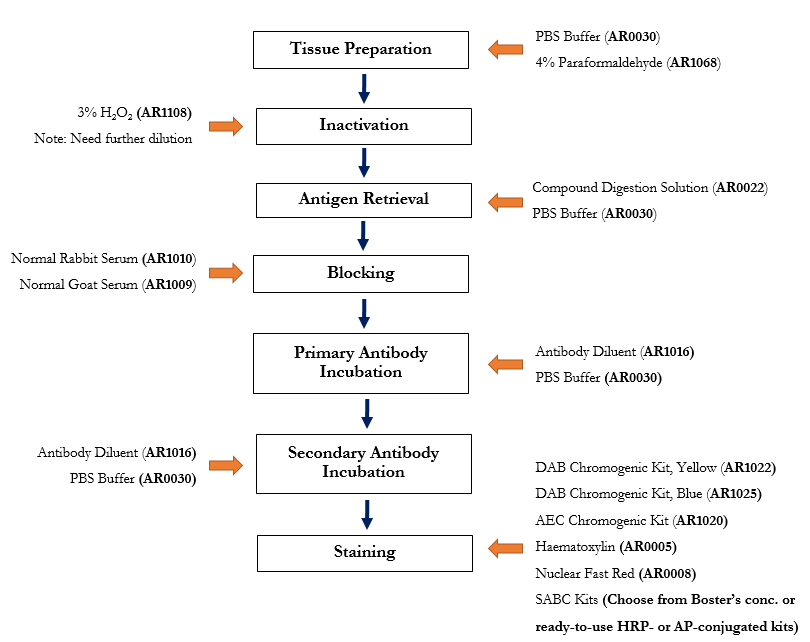
IHC Workflow (Frozen Sections) with Applicable Boster Reagents

IHC-F Protocol Details

Step-by-step guide for IHC-F protocol with reagent recommendations

  • Snap Freezing and OCT Embedding

    Products Listed: PBS Buffer - 4% Paraformaldehyde

    1. Harvest fresh tissue and place it in a dish filled with ice-cold PBS buffer
    2. Wash the tissue thoroughly with PBS to remove blood (Use forceps to remove connective tissues)
    3. Cut the tissue into slices of thickness of 3 mm or less
    4. Immediately snap freeze the tissue in iso-pentane cooled in dry ice and keep the tissue at -70°C (Do not allow frozen tissue to thaw before cutting)
    5. Prior to cryostat sectioning, position the tissue in a mold* and cover the tissue completely in Optimal Cutting Temperature (OCT) embedding medium

      * The mold can simply be made by using tin foil

    6. Use forceps to take the bottom part of mold into liquid nitrogen for 1 to 2 min (The OCT should change to white)
  • Inactivation

    Products Listed: 3% H2O2

    • Mix 3% H2O2 with distilled water (v/v: 1:50)
    • Immerse frozen section or cell climbing slice into the diluted H2O2 at room temperature for 10 min
    • Wash the section 3X distilled water (1 min each)
  • Antigen Retrieval (Proteolytic Induced Epitope Retrieval: PIER)

    Products Listed: Enzyme Antigen Retrieval Reagent - PBS Buffer

    • Dry the frozen sections with filter paper
    • Add compound digestion solution (e.g. Trypsin solution or other enzymatic antigen retrieval solution) to the sections or slices
    • Incubate the sections at room temperature for 3 to 5 min
    • Wash the sections with 3X PBS Buffer (5 min each)
  • Blocking

    Products Listed: 5% BSA blocking solution

    • Add 5% BSA blocking solution or normal goat serum to the PIER treated samples
    • Incubate the samples at 37°C for 30 min
    • Shake off extra liquid and dry the samples with filter paper (No washing required)
  • Primary Antibody Incubation

    Products Listed: Antibody Diluent - PBS Buffer

    • Dilute primary antibody with antibody diluent to the concentration recommended by the antibody manufacturer
    • Add the diluted antibody to the samples and incubate at 37°C for 30 min
    • Wash the samples 2X with PBS (20 min each)
  • Secondary Antibody Incubation

    Products Listed: Antibody Diluent - PBS Buffer

    • Dilute biotinylated secondary antibody with antibody diluent to the concentration recommended by the antibody manufacturer
    • Add the diluted antibody to the samples and incubate at 37°C for 30 min
    • Wash the samples 3X with PBS (8 min each)
  • IHC Frozen setions Staining Protocol

    DAB Chromogenic Kit, Yellow - AEC Chromogenic Kit - Haematoxylin - Nuclear Fast Red - PBS

    • Add Strept-Avidin Biotin Complex (SABC) HRP- or AP-conjugated reagents to the samples
    • Incubate the samples at 37°C for 30 min
    • Wash the samples 3X with PBS (20 min each)
    • Add a suitable amount of DAB reagent to the samples and incubate in dark at room temperature for 10 to 30 min
    • Monitor the tissue staining intensity under a bright-field microscope*
    • Wash the samples 3X to 5X with distilled water
    • Counterstain (if necessary)
    • Add Haematoxylin to the sample
    • Dehydrate
    • Immerse the paraffin sections 2X in dimethyl benzene (7 min each)
    • Check the tissue staining intensity under a bright-field microscope
      * If the staining background is too high, wash the section 4X with 0.01-0.02% TWEEN 20 PBS and 2X with pure PBS after the SABC reaction and before DAB staining. Then use DAB to stain the samples.

ICC/IF Workflow Overview

Boster offers the full range of reagents one needs for performing smooth immunohistochemistry (IHC), immunofluorescence (IF), and immunocytochemistry (ICC) assays. See the protocol below with available Boster products highlighted.
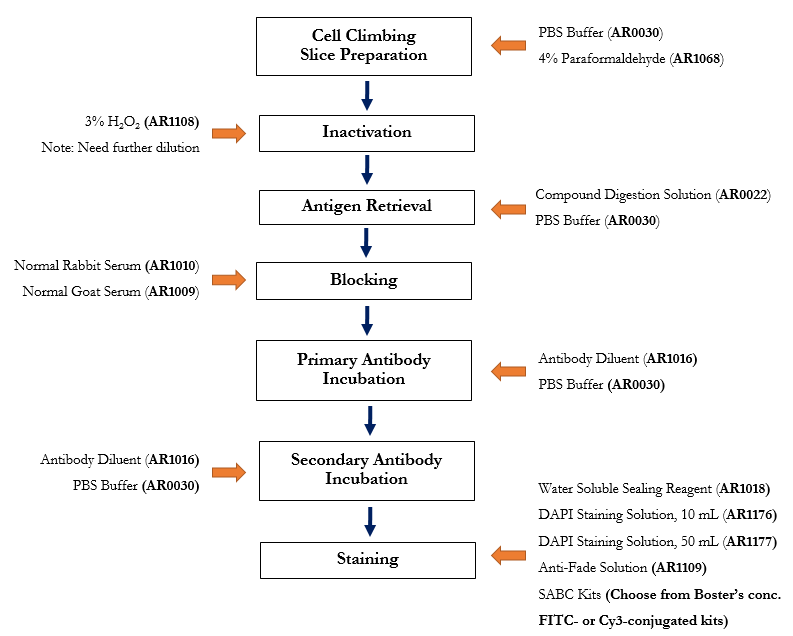
Immunocytochemistry (ICC) Workflow with Applicable Boster’s Reagents

ICC/IF Protocol Details

Step-by-step guide for ICC/IF protocol with reagent recommendations

  • Cell Climbing Slice Preparation

    Products Listed: PBS Buffer - 4% Paraformaldehyde

    • Place settled coverslip in culture bottle or perforated plate
    • Take out coverslip after cell growth has reached 60%
    • Wash the coverslip 3X with PBS to remove culture medium
    • Immerse the coverslip (cells face up) into cold acetone or 4% Paraformaldehyde or neutral formalin for 10 to 20 min (Close the lid to prevent evaporation)
    • Wash the coverslip 3X with PBS
    • Put the coverslip on filter paper (cells face up)
    • Remove the liquid on the coverslip and allow it to dry for 8-10 hrs
    • To thaw the slice, wash with neutral PBS at room temperature for 10-15 min (The cell climbing slice can be stored in gelatin at -20°C for one week.)
    • Note: This fixation procedure using paraformaldehyde and formalin fixatives may cause autofluorescence in the green spectrum. In this case, you may try fluorophores in the (i) red range or (ii) infrared range if you have an infrared detection system.
  • Inactivation

    Products Listed: 3% H2O2

    • Mix 3% H2O2 with distilled water (v/v: 1:50)
    • Immerse frozen section or cell climbing slice into the diluted H2O2 at room temperature for 10 min
    • Wash the section 3X distilled water (1 min each)
  • Antigen Retrieval (Proteolytic Induced Epitope Retrieval: PIER)

    Products Listed: Enzyme Antigen Retrieval Reagent - PBS Buffer

    • Antigen retrieval (AR) is the process of breaking protein cross-links that mask antigens in formalin-fixed tissue sections. Antigen retrieval breaks the protein cross-links, enhancing staining intensity by unmasking the antigens and epitopes in formalin-fixed and paraffin embedded tissue sections. Read on how you can effectively select the right antigen retrieval method
    • Dry the cell slices with filter paper
    • Add compound digestion solution (e.g. Trypsin solution or other enzymatic antigen retrieval solution) to the slices (We recommend the addition of 0.1% Triton to the samples before the digestion. This reduces surface tension and allows reagents to easily cover the entire sample.)
    • Incubate the slices at room temperature for 10 min
    • Wash with 3X PBS Buffer < (10 min each)
    • Problems encountered in this step can result in a weak signal. Find out how you can troubleshoot the antigen retrieval protocol here

    Read on how you can effectively select the right antigen retrieval method

  • Blocking

    Products Listed: 5% BSA blocking solution

    • Add 5% BSA blocking solution or normal goat serum to the PIER treated samples
    • Incubate the samples at 37°C for 30 min
    • Shake off extra liquid and dry the samples with filter paper (No washing required)
  • Primary Antibody Incubation

    Products Listed: Antibody Diluent - PBS Buffer

    • Dilute primary antibody with antibody diluent to the concentration recommended by the antibody manufacturer
    • Add the diluted antibody (Recommended concentration: 0.4 µg to 2 µg) to the samples and incubate at 4°C overnight
    • Wash the samples 3X with PBS Buffer (15 min each)
  • Secondary Antibody Incubation

    Products Listed: Antibody Diluent - PBS Buffer

    • Dilute biotinylated secondary antibody with antibody diluent to the concentration recommended by the antibody manufacturer
    • Add the diluted antibody to the samples and incubate at 37°C for 30 min
    • Wash the samples 3X with PBS Buffer (8 min each)
  • Immunocytochemistry (ICC) Staining

    Aqueous Mounting Medium - DAPI - DAPI - Antifade Mounting Medium -

    • Add Strept-Avidin Biotin Complex – Fluorescence Iso-Thio-Cyanate (SABC-FITC) or Strept-Avidin Biotin Complex – Cyanine-3 (SABC-Cy3) reagents to the samples
    • Incubate the samples at 37°C for 30 min (Avoid light)
    • Wash the samples 2X with PBS (Total 2 hrs)
    • Seal the slices with water-soluble sealing reagent
    • Monitor the staining intensity under a fluorescence microscope
    • Counterstain by adding DAPI staining solution to the sample
    • Check again the staining intensity under a fluorescence microscope
    • For slide storage without significant decay in fluorescence signal, add 20 µL of the anti-fade solution to the sample followed by a cover glass (Avoid bubbles)

    Learn the probable causes and solutions of weak or no staining

Uncover the complexity of tissue microenvironments with multiplex IHC! By examining multiple biomarkers in the same tissue sample, our multiplex immunohistochemistry approach allows you to unravel intricate cellular interactions and gain deeper insights into the tumor microenvironment.

Related Pages

IHC Principle

The principle behind Immunohistochemistry (IHC) entails detection of antigen or happens in cells of a tissue section by exploiting the principle of antibodies binding specifically to antigens in biological tissues. Learn more about this in this guide.

Learn the concept of IHC Principle

IHC Optimization

IHC optimization is a critical step in any test. This guide gives you insight on antigen retrieval, fixation and embedding. Learn how to optimize your immunohistochemistry test to get valuable results.

Learn our IHC Optimization tips

IHC Troubleshooting Tips

This guide provides a thorough list of Immunohistochemistry troubleshooting tips, including weak staining, high background, non specific staining among others. Learn how to take control of your IHC process..

Check our IHC troubleshooting tips

IHC Sample Preparation

Learn the best IHC and ICC sample preparation techniques. Get a detailed procedure of preparing different types of preserved tissues which is key to getting high quality staining during Immunohistochemistry (IHC)..

Check out our IHC Sample Preparation