This website uses cookies to ensure you get the best experience on our website.
- Table of Contents
Everything You Need to Know About Immunohistochemistry (IHC) principle.
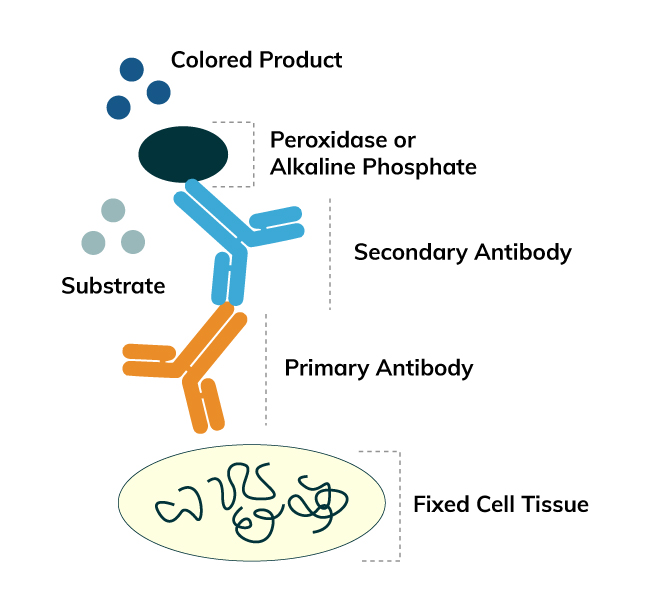
Immunohistochemistry (IHC) is a method for detecting antigens or haptens in cells of a tissue section by exploiting the principle of antibodies binding specifically to antigens in biological tissues. The antibody-antigen binding can be visualized in different manners. Enzymes, such as Horseradish Peroxidase (HRP) or Alkaline Phosphatase (AP), are commonly used to catalyze a color-producing reaction.
IHC is widely used in many research and clinical laboratories because this technique makes it possible to visualize the distribution and localization of specific cellular components within cells and in proper tissue context. There are numerous IHC methods that can be used to localize antigens. The method selected should include consideration of parameters such as the specimen types and assay sensitivity.
Really save you 50% on IHC reagents?
Sample collection and preparation play an important role in IHC, and effective IHC sample processing ensures that antigen exhibition and localization are preserved throughout the workflow.
Tissue samples are typically taken from specimens of various sources: biopsy, surgery, animal model and autopsy. The first three types of specimens give fresh tissues while the last one (autopsy) is taken after an animal has died for two hours which is more or less a postmortem autolysis. As antigens may denature, disappear and diffuse, autopsy specimen should be fixated as soon as possible so as not to influence its label.
Exercise caution when collecting, fixating and sectioning the samples
Protocols, optimization tips, troubleshooting guides, and more for IHC.
 Technical resources
 Download troubleshootingnhandbooks for IHC, Western blot and ELISA for FREE.
 Troubleshooting guides
Fixation preserves tissue morphology, stabilises antigens, and prevents enzymatic degradation.
Below is a list of commonly used fixing solutions. You may need to test whether a specific type of solution is appropriate for your detected antigens because there is no standard fixing solution for different kinds of antigen immobilization.
These two types of solutions, which are primary fixing solutions, play a role of precipitating sugars and fat as well as maintain the immunologic competence.
It is a functional cross-linking agent which is widely used due to its span penetrability, low contractibility and low background. It helps keep the cross-linking between tissues and maintain antigen.
In recent years, a new type of formaldehyde-free fixing solution has become available. With low toxicity and degradable chemical agent, this solution has gained a broad popularity in IHC, regular pathological examinations and molecular pathology detections due to the use of non-protein cross linking, span DNA/RNA preservation, and absence of cell vacuole, tissue shrinkage and pyknosis.
The immersion method marinates the tissue in fixing solution (at 4℃ if needed) for a specified period which is determined by the antigen stability and type of fixing solution used. Biopsy and surgical specimens as well as other non-irrigation tissues commonly employ this fixation method.
This method has the ability to fix tissues fully and quickly, suppressing the interference of endogenous peroxidase. Therefore, it is a method of choice in animal experiments.
The fixation time depends on the tissue thickness, solution concentration and experimental temperature. In principle, the time is directly proportional to the tissue thickness but inversely proportional to the solution concentration.
Exercise caution when fixating tissues
The following pre-treatment procedure is designed to prevent peeling caused by elevated temperature, high pressure, radiation and other factors.
Due to the oil attached on surface, a new slide should be dipped into cleaning solution for 12 to 24 hours. After washing the slide more than 5X in distilled water, dip it into 95% alcohol for 2 hours followed by drying with simple wiping or in an infrared oven. Pay attention to avoid scratching the slide during washing.
Note: Microscopic slide for IHC is required to be 5 μm. However, the slide for nervous tissue should be 20-100 μm to enhance the tracking of never fiber direction.
The coverslip pre-treatment procedure is very similar to the one for the microscopic slide except that dipping and cleaning should be completed in 2 hours because the coverslip is much thinner.
The most important feature for this type of tissue section is to keep antigen’s immune-competence completely, especially for the cell surface antigen. Both fresh and fixed tissues can be processed as frozen tissues. However, the tissues must be dried (or primary fixed) and stored at low temperature.
Paraffin-embedded tissue section is normally sliced by a rotary microtome to give a thickness of 2-7 μm. With proper treatment, the section reveals clear tissue structure and exact antigen location to enable high medical-value pathology researches and retrospective studies. This section type can be stored at 4℃ for long term use.
Paraffin embedding is a standard technique used to preserve and stabilize tissue for microtomy. It provides the structural support needed to obtain thin, uniform sections for microscopic analysis.
Before embedding, tissue must be fixed to preserve cellular structure and prevent autolysis or decomposition. Following fixation, dehydration is carried out using a graded series of ethanol or acetone (typically from 70% to 100%) to gradually remove water from the tissue. This step is critical—rapid dehydration can cause tissue hardening or shrinkage, compromising morphological integrity.
Once dehydrated, the tissue is treated with a clearing agent—commonly xylene, benzene, or toluene—to replace the dehydrating fluid. This step increases tissue transparency and ensures compatibility with paraffin, which is hydrophobic. Proper clearing is essential for uniform paraffin penetration.
The cleared tissue is immersed in molten paraffin wax maintained at 54–64 °C. This allows the wax to infiltrate all cellular and intercellular spaces, providing structural support. After sufficient infiltration (usually several hours), the tissue is oriented in a mold filled with molten paraffin and allowed to cool and solidify. The resulting paraffin block preserves the tissue architecture and is stable for long-term storage. It is then ready for microtome sectioning.
This is a process of treating the tissue in a paraffin box so that the paraffin wax cools down and solidifies. The treatment conditions (using ethanol and xylene as an example) are shown in the table below. After cooling is completed, the tissue will be ready for sectioning and suitable for storage.
| Step | Reagent | Time (Hours) |
|---|---|---|
| 1 | 75% Ethanol | 0.5 to 2 |
| 2 | 85% Ethanol | 0.5 to 2 |
| 3 | 95% Ethanol | 2 |
| 4 | 95% Ethanol | 2 |
| 5 | 95% Ethanol | 2 |
| 6 | 100% Ethanol | 0.5 to 1 |
| 7 | 100% Ethanol | 0.5 to 1 |
| 8 | 100% Ethanol | 0.5 to 1 |
| 9 | Xylene | 0.25 |
| 10 | Xylene | 0.25 |
| 11 | Xylene | 0.25 |
| 12 | Paraffin Wax | 0.5 |
| 13 | Paraffin Wax | 1 to 2 |
| 14 | Paraffin Wax | 1 to 2 |
Inactivation and blocking are critical preparatory steps in immunohistochemistry (IHC) and related staining protocols. They serve to eliminate unwanted background signals caused by endogenous enzyme activity and nonspecific antibody binding, thereby enhancing the signal specificity and clarity of staining.
Tissues often contain endogenous enzymes—such as peroxidases and alkaline phosphatases—that can catalyze chromogenic reactions independently of the intended antibody-target interaction. If left active, these enzymes can cause nonspecific staining, reducing the accuracy of results.
Careful optimization is essential—excessive blocking can interfere with target detection, while insufficient blocking allows background noise.
Antibodies, especially polyclonal ones, may bind nonspecifically to Fc receptors, charged sites, or other proteins present in tissue sections. This can lead to false positives and obscure specific antigen-antibody interactions.
To prevent this:
Effective blocking improves the signal-to-noise ratio, ensuring that only specific antibody-antigen interactions are visualized.
Formaldehyde fixation usually generates methylene bridges which cross-link proteins and therefore mask the epitope of interest. It is essential to unmask the antigen epitopes in order to allow the antibodies to bind, either by heat (Heat Induced Epitope Retrieval: HIER) or enzymatic digestion (Proteolytic Induced Epitope Retrieval: PIER).
The HIER method can be implemented by microwave, high pressure or water bath. It breaks the methylene bridges and exposes the epitope to allow the antibodies to bind by continuously heating. The following antigen retrieval reagent is required:
Notes
Epitope can be exposed by incubation with proteases which can break the methylene bridges. The choice for digestion enzymes depends on the antigenic components. Pepsin and bromelin are used for retrieving antigens in intercellular substance. Other enzymes can be used for intracellular antigen exposure.
| Enzyme | Working Concentration | Digestion Condition |
|---|---|---|
| Trypsin | 0.05% to 0.1% | 37℃ (10 to 40 min)* |
| Proteinase K | 20 µg/mL | 37℃ (20 min) |
| Pepsin | 0.40% | 37℃ (30 to 180 min) |
* The reaction time can be increased for certain worn-out tissues. Fresh trypsin solution should be prepared with pH adjusted to 7.6 and used at 37℃.
The most important feature for this type of tissue section is to keep antigen’s immune-competence completely, especially for the cell surface antigen. Both fresh and fixed tissues can be processed as frozen tissues. However, the tissues must be dried (or primary fixed) and stored at low temperature.
Paraffin-embedded tissue section is normally sliced by a rotary microtome to give a thickness of 2-7 μm. With proper treatment, the section reveals clear tissue structure and exact antigen location to enable high medical-value pathology researches and retrospective studies. This section type can be stored at 4℃ for long term use.
IHC detection methods vary and are based on the nature of analyze reporting and binding chemistry, among other factors. Three methods are described here: immunofluorescence (IF), Enzymatic and Affinity.
Coons and co-workers developed the IF technique in 1941. This technique is used for the rapid identification of an antigen by exposing it to known antibodies labeled with the fluorescent dye (i.e., fluorochrome) which produces light when excited by a laser (e.g. argon-ion laser). Specific antibody binding can be determined by the production of characteristic visible light and detected by a fluorescence microscope. Tables 1 and 2 show some of the common fluorechromes and their corresponding excitation (λex) and emission wavelengths (λem) for nuclear staining and IF, respectively.
Table 1: Common Fluorochrome for Nuclear Staining
| Fluorochrome | λex (nm) | λem (nm) | Color |
|---|---|---|---|
| AO | 405 | 530 → 640 | Yellowish (Green → Orange) |
| DAPI | 358 | 461 | Blue |
| EB | 488 | 610 | Red |
| PI | 488 | 620 | Red |
| Hoechst 33258 | 352 | 461 | Blue |
| Hoechst 33342 | 352 | 461 | Blue |
Coons and co-workers developed the IF technique in 1941. This technique is used for the rapid identification of an antigen by exposing it to known antibodies labeled with the fluorescent dye (i.e., fluorochrome) which produces light when excited by a laser (e.g. argon-ion laser). Specific antibody binding can be determined by the production of characteristic visible light and detected by a fluorescence microscope. Tables 1 and 2 show some of the common fluorechromes and their corresponding excitation (λex) and emission wavelengths (λem) for nuclear staining and IF, respectively.
Table 2: Common Fluorochrome for IF Labeling
| Fluorochrome | λex (nm) | λem (nm) | Color |
|---|---|---|---|
| Alexa 488 | 488 | 497 to 643 | Green |
| Alexa 546 | 530/545 | 610/675 | Red |
| Alexa 647 | 650 | 668 | Red |
| APC | 650 | 660 | Red |
| B-PE | 546, 565 | 575 | Orange, Red |
| Cy3 | 554 | 570 | Red |
| FITC | 495 | 525 | Green |
| RB200 | 570 | 596 | Orange |
| R-PE | 480, 546, 565 | 578 | Orange, Red |
| Texas Red | 596 | 620 | Red |
| TRITC | 552 | 570 | Red |
The indirect staining process involves three steps
After fluorescence staining, counterstain should be carried out to make morphological structure of cells and tissues well defined and specific fluorescence more easily visible. Some of the counterstaining fluorochromes are:
After staining, the samples should be observed and imaged immediately under a fluorescence microscope. They should be mounted in buffered glycerol medium and stored at 4℃ for less than one week if the image is not taken immediately. If anti-fluorescence decay medium is applied to the sample, fluorescence signal may not decay significantly within one month.
The enzymatic IHC technique was introduced by Nakane and Pierce in 1967. It identifies antigens of interest by exploiting the principle of antibodies binding specifically to antigens. An enzyme label is reacted with a substrate to yield an intensely colored product that can be analyzed. The enzymatic technique was developed with a similar principle to the IF technique but the two are different as an enzyme is used to label the antibody for the enzymatic method. The advantages of enzymatic IHC over IF IHC are:
For this method, the antibody used for antigen detection has been labeled with the enzyme before the reaction. After reacting with the targeted antigen, the labeled antigen forms an antigen-antibody complex where the enzyme catalyzes a substrate to yield an insoluble colored product. Subsequently, the product can be analyzed by a light microscope or electron microscope. The labeled-enzyme approach can be done by direct or indirect detections.
The direct method is a one-step staining method which involves a labeled antibody (e.g. HRP-conjugated antibody) reacting directly with the antigen of interest. The antigen-antibody-HRP complex is then allowed to react with a DAB substrate for staining.
While the direct method is simple, rapid and highly-specific, it has low sensitivity and a limited range of primary antibodies that are directly labeled. Despite the shortcomings, the direct method is commonly applied to screen monoclonal antibodies before the large-scale manufacturing process.
The indirect method is a two-step process which involves an unlabeled primary antibody (first layer) that binds to the target antigen in the sample and an enzyme-labeled secondary antibody (second layer) that reacts with the primary antibody. The secondary antibody must be raised against the IgG of the animal species in which the primary antibody has been raised. For instance, if the primary antibody is rabbit anti-human IgG, the enzyme labeled secondary antibody could be goat anti-rabbit IgG.
Comparing to the direct detection, the indirect detection has numerous advantages. First of all, only a relatively small number of standard conjugated (labeled) secondary antibody is needed to be generated for the indirect method. For example, a labeled secondary antibody raised against rabbit IgG, which can be purchased "off the shelf," is useful with any primary antibody raised in rabbit. With the direct method, it would be necessary to label each primary antibody for every antigen of interest. Secondly, the indirect method has greater assay sensitivity. Thirdly, various kinds of controls could be designed and applied with indirect detection.
Described by a publication from T.E. Mason and his colleagues in 1969, this method is based on the binding of an enzyme label to a target antigen through the antigen-antibody reactions of an immunoglobulin-enzyme bridge which consists of the following components in order:
This method involves immunization of a rabbit/goat/rat antibody with a HRP moiety to produce an anti-HRP rabbit/goat/rat antibody which would then bind to another HRP moiety to form a stable polygon. The PAP approach excels due to its high sensitivity and low background for tissue staining.
After fluorescence staining, counterstain should be carried out to make morphological structure of cells and tissues well defined and specific fluorescence more easily visible. Some of the counterstaining fluorochromes are:
After staining, the samples should be observed and imaged immediately under a fluorescence microscope. They should be mounted in buffered glycerol medium and stored at 4℃ for less than one week if the image is not taken immediately. If anti-fluorescence decay medium is applied to the sample, fluorescence signal may not decay significantly within one month.
The IHC sensitivity can be improved by employing a higher number of enzyme molecules bound to the tissue. In this regard, the multiple binding sites between the avidin and biotinylated antibodies have been exploited for IHC signal amplification. Avidin, an egg white protein, has four binding sites for the low-molecular-weight vitamin biotin to form a large lattice-like complex. Beside avidin, there are other methods which involve streptavidin which is a tetrameric biotin-binding protein that is isolated from Streptomyces avidinii. The avidin and streptavidin methods work almost identically as their structures are very similar (they have very little amino acid homology). Avidin-Biotin Peroxidase Complex (ABC) and Labeled Streptavidin Binding (LSB) are the two most widely used affinity methods for amplifying the target antigen signal.
The method involves four sequential steps
This method uses an enzyme-labeled streptavidin to detect the bound biotinylated primary antibody on the tissue section. It can also be applied if the complex in the ABC method is too big for tissue penetration. Due to its smaller size, the enzyme-labeled streptavidin is used to enable tissue penetration. The LSB method can be employed to replace the ABC method for the former’s ability to improve sensitivity and reduce signal further. The information below describes the general staining procedure.
DAB (3,3’-Diaminobenzidine) is typically used as a signal enhancer in conjunction with the HRP-based immunostaining systems. The dark brown end-product derived from DAB is insoluble in water and alcohol, stable and suitable for long-term storage. In addition, the end-product could be observed under a light microscope or processed with OsO4 for observation under electron microscopy. Hematoxylin, methyl green and methyl blue are the compatible counterstains. Since DAB may cause skin and bladder cancers, it is advised that personal protective equipment should be used and skin/mucosa should be avoided.
After staining with AEC (3-Amino-9-Ethylcarbazole), the positive area on tissue section changes to dark red. The end-product derived from AEC is soluble in organic solvent and cannot be stored on a long-term basis. Similar to DAB, hematoxylin, methyl green and methyl blue are some of the suitable counterstains for AEC. Glycerin gelatin should be used as the AEC mounting medium.
Used in conjunction, BCIP (5-Bromo-4-Chloro-3-Indolyl-Phosphate)/NBT (Nitro Blue Tetrazolium) is a widely accepted chromogenic substrate used in the AP-based immunostaining systems. After exposing to AP, the substrate changes to bluish violet or black violet. The end-product derived from BCIP/NBT is insoluble in alcohol. Nuclear fast red and brilliant green are the suitable counterstains for BCIP/NBT.
Fast Red is also used for the colorimetric detection of AP. Its end-product has a rose color and is soluble in alcohol. These counterstains are used for the Fast Red chromogens: methyl green, brilliant green and soluble hematoxylin.
After staining the target antigen by IHC, a secondary stain is usually applied to provide contrast that helps the primary stain more distinct. While many of these stains show specificity for discrete antigens or cellular compartments, other stains will deliver the staining of a whole cell. Some of the most common counterstains are described as follows:
Hematoxylin, a natural dye which is extracted from the heartwood of the logwood tree, is used for cell nucleus staining. Differentiation refers to the process of using reagents (e.g. 1% hydrochloric acid HCl and alcohol) to remove the color caused by overstaining or non-specific staining on sample tissues. After running nucleolar staining (in aluminum hematoxylin) and differentiation (in HCl and alcohol), the tissue section is transferred from an acid solution to an alkaline solution (e.g. ammonia water and disodium hydrogen phosphate solution). During this process, the section will change from red brown into blue. This procedure is known as bluing.
Hematoxylin is sub-categorized into Mayer’s Hematoxylin and Harris Hematoxylin.
Methyl green consists of metallic green microcrystals or bright green powders. It becomes bluish green when dissolved in water. This basic dye can be easily bounded with highly polymerized DNA and changes the nucleus to green. Counterstain with methyl green takes 2 to 5 min which should be followed by washing the sample, dehydration and mounting.
This counterstain will change the nucleus to red after applying to the tissue section for 2 to 5 min.
A mounting medium may be used to attach a coverslip or may itself be used to replace the coverslip. Generally, the medium selection depends on a few factors including the chemical compatibility with chromogen and counterstain as well as the preservation period.
It usually refers to an oily substance with pH 7.0 such as neutral gum (resin). Before mounting, the sample should be treated with dimethyl benzene, transparent and dehydrated for long-term storage sections.
Popularly used in IF staining for short-term storage sections, this mounting medium usually consists of 50% glycerol.
The table below summarizes the choice of mounting medium among different enzymes, chromogens and counterstains.
| Enzyme | Chromogen | Counterstain | Mounting Medium |
|---|---|---|---|
| HRP | DAB | Hematoxylin, Methyl Green, Methyl Blue | Neutral |
| HRP | AEC | Hematoxylin, Methyl Blue | Water Soluble |
| AP | BCIP/NBT | Nuclear Fast Red, Brilliant Green | Neutral |
| AP | Fast Red | Hematoxylin, Methyl Green, Brilliant Green | Water Soluble |
Maximize the potential of multiplex IHC for comprehensive biomarker analysis! Our advanced technology enables simultaneous detection of multiple targets within a single tissue sample, providing a deeper understanding of complex biological processes.
Here are the 300 most popular antibodies.

IHC optimization is a critical step in any test. This guide gives you insight on antigen retrieval, fixation and embedding. Learn how to optimize your immunohistochemistry test to get valuable results.
Learn IHC Optimization tips
BosterBio has a detailed stepwise IHC protocol with a clearly illustrated IHC workflow with recommended reagents. Learn how to effectively implement a successful immunostaining for tissue sections and cell climbing slices.
Learn our IHC Protocol
This guide provides a thorough list of Immunohistochemistry troubleshooting tips, including weak staining, high background, non specific staining among others. Learn how to take control of your IHC process.
Check our IHC troubleshooting tips
Learn the best IHC and ICC sample preparation techniques. Get a detailed procedure of preparing different types of preserved tissues which is key to getting high quality staining during Immunohistochemistry (IHC).
Check out our IHC Sample Preparation