What Is Cell Fixation and Why Is It Important?
In conducting immunohistochemistry (IHC) and immunofluorescence (IF) experiments, one crucial step is the fixation of cells to preserve them. For experiments that require precise protein visualization and expression tracking,
reporter cell lines can be used in conjunction with
optimized fixation protocols. This prevents cell autolysis and degradation caused by proteolytic enzymes and increases the mechanical strength of the cell structure.
Fixation ensures the cell's morphology and structure remain intact, maintaining a "lifelike" appearance.
Pathology Review Service provides
in-depth analysis to ensure
optimal sample preparation and accurate interpretation. For gene expression studies using
stable reporter constructs, efficient gene delivery systems are essential. Our
AAV Packaging Service supports high-efficiency transduction, ideal for creating reliable reporter cell lines used in IF and
IHC workflows.
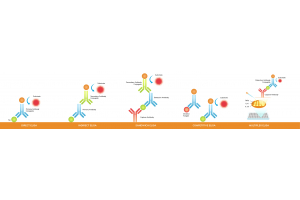
Types of Fixatives Used in IHC and IF
Fixatives are generally categorized into two main types based on their method of fixation:
1. Cross-linking fixatives (Aldehyde-Based)
This method involves forming covalent bonds with proteins through amine groups using small molecules. Formaldehyde, typically in the form of paraformaldehyde, is the most common reagent, while glutaraldehyde is often used for electron microscopy. Cross-linking fixatives are well-suited for membrane protein immunostaining. Compared to alcohol-based fixatives, aldehydes can penetrate the plasma membrane and fix soluble proteins, although some targets may lose their antigenicity during aldehyde cross-linking.
2. Precipitating fixatives (Alcohol & Acetone-Based)
These work by precipitating proteins and include agents like methanol and acetone. While they can dissolve membranes, they may cause soluble proteins to adhere to cell structures, making them unsuitable for overexpressed fluorescent proteins (such as GFP).
Ethanol and Methanol
Ethanol and methanol are frequently used in organic solvent-based fixatives, particularly in IF experiments, to fix cell cultures and tissue sections.
Advantages: These solvents penetrate cells and tissues quickly, and the fixation process is rapid. They do not significantly mask antigen epitopes, which means that in many cases,
antigen retrieval is unnecessary. Additionally, ethanol and methanol can fix both lipids and nucleic acids, making them suitable for detecting nuclear proteins and small molecules.
Disadvantages: A drawback of organic solvent fixatives is that they dehydrate cells, potentially causing some morphological disruption. For example, cell membranes may be affected, which could interfere with the detection of membrane proteins. Additionally, ethanol and methanol do not preserve cellular ultrastructure as well as aldehyde fixatives, making them less ideal for detailed studies of organelles.
Acetone
Acetone is another organic solvent fixative, commonly used for cold fixation. It can be applied at low temperatures (-20°C), helping to preserve temperature-sensitive antigens.
Advantages: Acetone fixes tissues very quickly and penetrates cells effectively, making it suitable for thicker tissue sections and cell aggregates. Like ethanol and methanol, acetone generally does not mask antigen epitopes, which makes it well-suited for IF experiments.
Disadvantages: Acetone can also disrupt the cell membrane, making it unsuitable for detecting membrane proteins. Its fixation process can be rough, potentially leading to the loss or damage of some cellular structures.
Considerations When Choosing a Fixative for Your Experiment
When selecting a fixative, it is essential to consider the specific requirements of the experiment. Several factors must be considered:
Impact on Antigen Stability and Antibody Binding
Different antigens have varying sensitivities to fixation. Some antigens may be masked by aldehyde fixatives and require gentler fixation methods, such as organic solvents or low-concentration formaldehyde. Other antigens may be more resistant to fixation and remain detectable under stronger fixation conditions, making glutaraldehyde a viable option.
Fixation for Thick Tissue Sections vs. Cell Cultures
The thickness and density of tissue samples affect fixative penetration. For thick tissue sections, formaldehyde offers good penetration, making it suitable for most
IHC experiments. For cell cultures, organic solvent fixatives, which work through rapid dehydration, may be more appropriate.
When to Use Antigen Retrieval After Fixation
If the focus of the experiment is to preserve cellular or tissue ultrastructure, such as in electron microscopy, a stronger cross-linking fixative like glutaraldehyde is preferred. However, if the goal is to detect antigen expression, antigen retrieval and fixative effects on antigen recognition must be considered.
Fixatives’ Impact on IHC and IF Staining
The choice of fixative directly impacts antibody binding to antigens in IHC and IF experiments. Highly cross-linking fixatives, such as glutaraldehyde, can preserve structures but may reduce antibody binding efficiency. Therefore, antigen retrieval steps are often needed post-fixation to restore the detectability of masked antigen epitopes. This is particularly important for
multiplex IHC, where multiple markers must be preserved and detected simultaneously without cross-reactivity or signal loss.
Additionally, in IF experiments, the choice of fixative may affect the intensity of fluorescent signals. Some fixatives can diminish fluorescence, so selecting a fixative compatible with fluorescent dyes is important.
Step-by-Step Experimental Procedures for Fixation
The steps involved in cell fixation experiments vary depending on the form of the sample being fixed. Cells or small tissues can be immersed in fixative solutions, while larger tissues may require perfusion fixation through the circulatory system for more rapid and uniform results.
Method 1 - Immersion Fixation (For cells and small tissues)
The ideal fixation time depends on the size and type of the tissue block, but 18-24 hours of fixation is suitable for most applications. Under-fixation may result in edge staining, where the edges of the section show strong signals but the center has no signal.
Over-fixation may mask epitopes; antigen retrieval can help overcome this issue, but if the tissue is fixed for too long (i.e., over two days), no signal may be obtained even after antigen retrieval.
Method 2 - Perfusion Fixation (For whole organs)
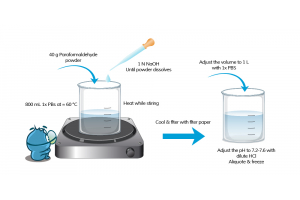
(using 4% paraformaldehyde to fix most organs in rats as an example):
A: Set up the perfusion pump; connect the perfusion kit and perfusion needle. First, flush the tubing with about 100 mL of tap water to remove any residues. Then, place the open end of the perfusion tube into a beaker containing cold 4% paraformaldehyde (placed in an ice box). The solution volume should be proportional to the animal's body weight, and usually, 200-300 mL of fixative is sufficient for one animal. Open the valve, adjust the drip rate to a slow, steady rate (20 mL/min), and then close the valve.
B: Prepare for surgery by placing scissors, forceps, and clamps nearby. Administer an appropriate dose of anesthetic to the animal. Once anesthetized, place the animal supine on the surgical table. Tape the limbs in place to securely fix the animal.
C: Use the pinch reflex method to assess the depth of anesthesia. The animal must be unresponsive before proceeding to the next step.
D: Use a scalpel to make an incision along the diaphragm. Cut the connective tissue at the bottom of the diaphragm with sharp scissors to expose the chest wall.
E: Use large scissors, with the blunt end pointing downward, to cut along the midline of the chest wall, slightly to the left of the center.
F: Horizontally cut across the center or ends of the chest wall, opening the chest cavity. Use clamps to hold the chest open and expose the heart, allowing blood and fluids to drain.
G: Grasp the heart with forceps (the heart should still be beating), and insert the needle directly into the protrusion of the left ventricle, extending upward about 5 mm. Be careful not to insert the needle too deeply to avoid piercing the inner wall and disrupting solution circulation. Secure the needle near the insertion point. Open the valve and allow 0.9% saline solution to drip in slowly and steadily at about 20 mL/min.
H: Use sharp scissors to cut open the atrium to ensure free flow of the solution. If the liquid does not flow freely or if it flows out of the animal’s nasal or oral cavities, reposition the needle.
I: Once the blood is drained, replace the solution with 4% paraformaldehyde (200–300 mL).
J: Be careful not to introduce air bubbles when changing the solution. Throughout the perfusion process, it is advisable to wear safety goggles.
When spontaneous movement in the animal and lightening of the liver’s color is observed, the perfusion is essentially complete (generally, it takes about 30-60 minutes for an adult rat, though the time may vary depending on the animal's body weight and the experimental technique).
K: Stop the perfusion and excise the target tissue. Place the tissue in a sample vial containing the same fixative solution, and continue post-fixation on ice or at 4°C for 2 hours before dehydration and embedding. For better results, the tissue can be immersed overnight at 4°C.
In conclusion, the choice of fixative is a crucial step in IHC and IF experiments, determining both the detectability of antigens and the preservation of cell structure. Aldehyde fixatives are ideal for structural preservation but may require antigen retrieval, while organic solvents fix quickly but may impact cell morphology. Thus, selecting the appropriate fixative based on experimental needs, antigen properties, and tissue type is essential for optimal sample preservation and subsequent analysis.
Learn More About Fixation and IHC Optimization
Explore more resources to support your IHC workflows and experimental design.