This website uses cookies to ensure you get the best experience on our website.
- Table of Contents
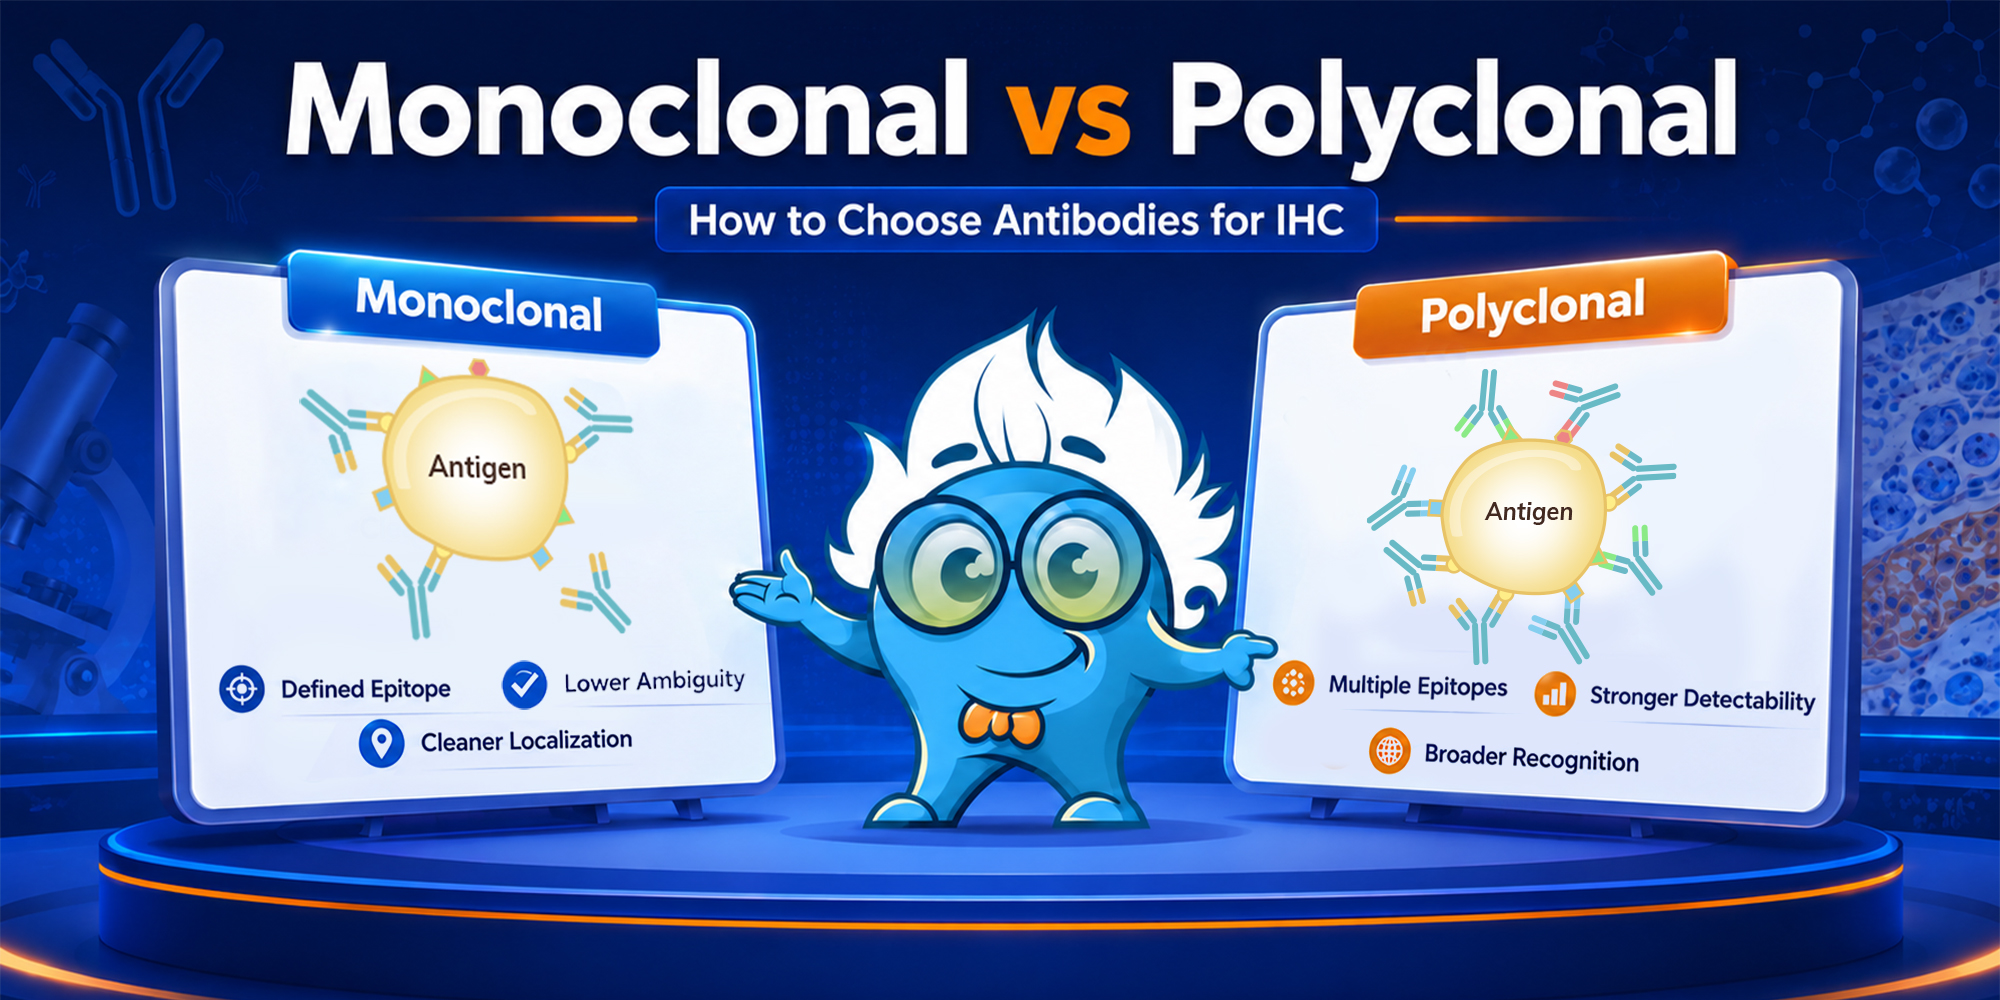
Choosing between a monoclonal and a polyclonal primary antibody for IHC is less about picking the “better” antibody type and more about deciding which mistake you can least afford.
A useful first question is: are you more worried about missing a real target, or mistaking background for true staining?
If the risk is missing a difficult or poorly exposed target, a polyclonal antibody may be a useful starting point. If the risk is wrong localization, background, or inconsistent sta...
Immunohistochemistry staining delivers spatial context that bulk methods cannot replicate, but every protein detection method carries trade-offs in sensitivity, throughput, and sample compatibility. This review maps out where each approach excels, how to choose the right tool for your study design, and how to avoid the most common method-selection errors in cancer research and longitudinal biomarker studies, particularly in the context of protein quantification methods and protein assay techniques.
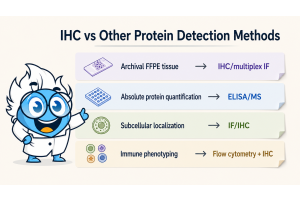
Choose immunohistochemistry (IHC) when you need to localize a protein within intact tissue, score expression at the single-cell or compartment level, or work with archival FFPE samples. Use ELISA or mass spectrometry when you need precise absolute quantification from cell lysates or serum. Use immunofluorescence (IF) when multiplexing four or more markers on the same section. The right choice depends on three variables: your sample type, whether spatial context is scientifically necessary, and how your data will drive downstream decisions such as treatment selection or biomarker validation.
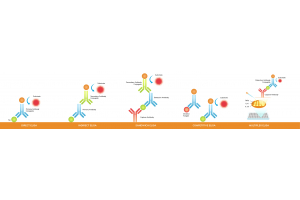
Figure 1. Schematic overview of the standard immunohistochemistry procedure on FFPE tissue, illustrating antigen-antibody binding and enzyme-mediated chromogenic detection. Spatial localization of signal within cellular compartments is preserved throughout.
Choosing between immunohistochemistry and alternative protein detection methods is rarely a simple binary decision. Each approach interrogates protein biology from a different vantage point, including protein structure, protein–protein interactions, and broader biological processes such as cell signaling and enzymatic catalysis.
While IHC provides spatial localization, bulk techniques such as enzyme-linked immunosorbent assay and mass spectrometry focus on protein quantification and protein quantitation. These methods often rely on protein assays to measure protein concentration in lysates or serum samples.
ELISA, for example, depends on a standard curve generated from known concentrations of the target analyte, enabling accurate protein quantification methods in high-throughput workflows using plate reader systems or microplate readers.
Immunohistochemistry staining is the only widely adopted protein detection method that simultaneously preserves tissue morphology, enables single-cell resolution, and integrates directly with routine pathology workflows. This makes it indispensable for immunohistochemistry cancer diagnosis and biomarker-driven treatment selection.
When researchers ask "why is an IHC test required," the answer usually involves one of three needs: anatomical localization of a protein biomarker, regulatory-pathway h...
Choosing the wrong secondary antibody can quickly turn an IHC stain into a high-background result. This article explains how to reduce non-specific staining by looking beyond host-species matching and checking the factors that matter most: primary isotype, tissue species, cross-reactivity, blocking strategy, detection system, and no-primary controls. For the full staining workflow, review Boster’s IHC protocol before optimizing the detection step.
In a simplified workflow, the secondary antibody binds the primary antibody and carries the detection label. In real tissue, it also encounters endogenous immunoglobulins, Fc receptor-positive cells, blood components, extracellular matrix, endogenous enzymes, and autofluorescent structures. If it binds an unintended target, the detection system can amplify that weak interaction into visible background.
Secondary antibody background in IHC is context-dependent: the same reagent may be clean in one tissue but produce diffuse haze in another. If the pattern is difficult to interpret, compare it with common patterns of non-specific staining in IHC. Often, the antibody is not inherently unsuitable; it is too broad, insufficiently adsorbed, or poorly matched to the tissue or detection system. Similar issues may also appear during Western blot optimization and flow cytometry panel validation when secondary specificity is not carefully controlled.
Secondary antibody selection starts with the primary antibody, but it should not stop at host-species matching. For rabbit primaries, Anti-Rabbit IgG detection is often straightforward. Mouse monoclonals need more caution because many are IgG1, IgG2a, IgG2b, IgG3, or IgM. For mouse IgG primaries, a broad anti-mouse IgG H+L secondary is convenient, but its breadth can increase background in sensitive IHC.
If the primary antibody is a mouse IgG1 monoclonal, an anti-mouse IgG1-specific secondary may be cleaner than a broad anti-mouse IgG H+L secondary. This matters even more in multiplex IHC, mouse-on-mouse staining, or immune-rich tissue, where broad recognition can blur the difference between true signal and endogenous Ig, Fc-related binding, or cross-reactivity.
For low-background IHC, the best secondary is not necessarily the broadest one. It detects the intended primary reliably without adding unnecessary tissue signals. If you are still selecting the upstream reagent, start with an IHC-validated primary antibody that matches your target antigens, sample species, and application. Careful review of the species of primary antibody and class and subclass of primary antibody is important during assay planning, especially when working with monoclonal antibodies, polyclonal antibodies, or newer formats such as VHH antibodies.
One common IHC mistake is choosing the secondary based only on the primary antibody while ignoring tissue species. In mouse-on-mouse IHC, an anti-mouse secondary may bind endogenous mouse immunoglobulins in the tissue, not just the mouse primary antibody. The result may look like diffuse haze, tissue-associated staining, or apparent positivity in negative areas.
Extra caution is needed for spleen, lymph node, bone marrow, inflamed tissue, blood-rich samples, a...

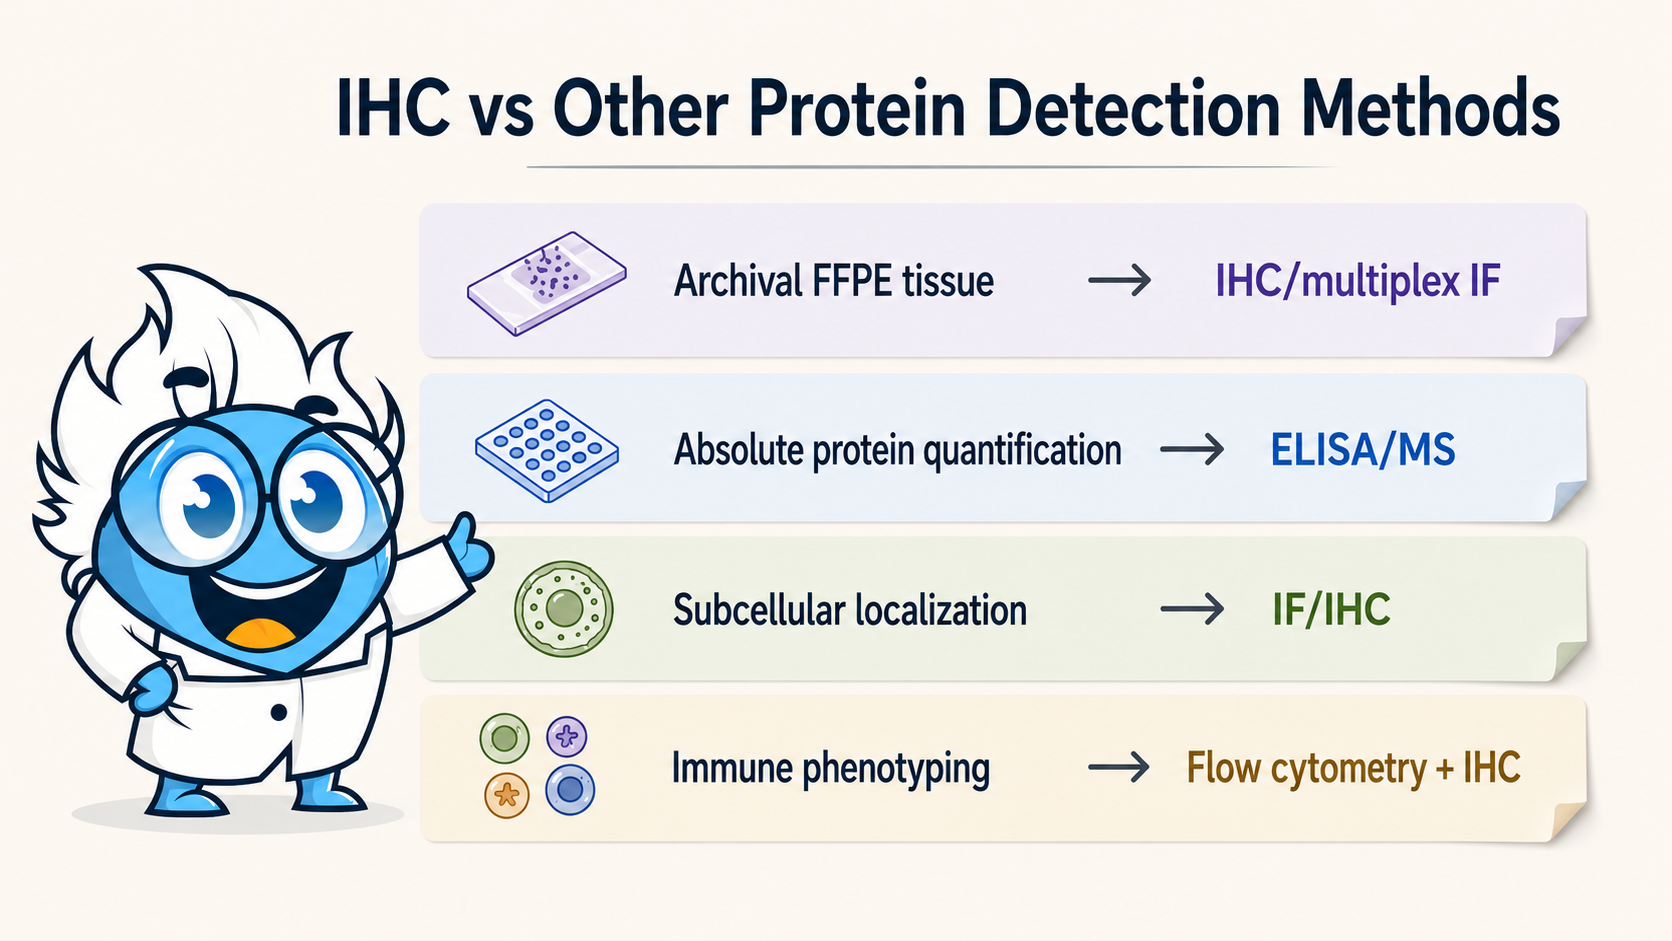
Blocking is one of the easiest IHC steps to over-adjust. When the background is high, it is tempting to extend the blocking time, increase blocker concentration, or switch to a stronger product. But the best blocking strategy is not the strongest blocker. It is the one that matches the likely source of background. In some workflows, the selected blocking buffer can also influence downstream compatibility with related assays such as Western Blotting and multiplex fluorescence applications.
A practical rule: use serum when secondary antibody or Fc-related background is likely, BSA when you need a cleaner defined blocker, and commercial protein block when background control and workflow consistency matter most.
The real question is not “Which blocker is best?” It is “What kind of background am I trying to reduce?”
Do not change the blocker until you have looked at the shape of the background.
A diffuse haze across the whole tissue may suggest non-specific protein binding, excessive antibody concentration, or insufficient washing. Background concentrated in immune-rich tissues such as spleen, tonsil, lymph node, or inflamed tissue may point to Fc-mediated binding. A positive secondary-only control suggests the problem is coming from the secondary antibody or detection system, not the primary antibody. Edge staining or signal around damaged areas may reflect tissue drying, over-retrieval, section damage, or uneven washing.
This matters because blocking mainly addresses non-specific protein interactions. It will not correct endogenous peroxidase activity, endogenous biotin, tissue autofluorescence, over-retrieval damage, poor washing, or an antibody used too concentrated. Similar principles are also important in Western blots, where inappropriate blocking conditions may increase background noise and reduce assay specificity.
If the background pattern is unclear, separate true non-specific staining from detection or tissue-related artifacts before changing every condition at once. Boster’s guides to non-specific staining in IHC and high background in DAB staining are useful follow-up references.
Normal serum contains a broad mix of proteins that can occupy non-specific binding sites and reduce unwanted secondary antibody interactions. It is often a good starting point for indirect IHC workflows, especially in immune-rich tissues or samples with Fc receptor activity.
In many workflows, the blocking...
Choosing between FFPE and frozen sections is one of the first decisions that can shape the outcome of an IHC experiment. FFPE sections usually provide stronger tissue morphology, storage stability and workflow consistency, while frozen sections can better preserve certain fixation-sensitive antigens, lipids, and enzyme activity. But that is only the first layer of the decision.
The best choice should also account for antibody validation, antigen retrieval, detection method, storage conditions, and the practical reliability of your staining workflow. In other words, the real question is not simply “Is FFPE or frozen better?” It is: “Which tissue type best matches what this IHC result needs to show?”
When IHC staining gives weak signal, high background, or inconsistent localization, the antibody is often blamed first. In practice, the problem may start much earlier.
Before the primary antibody reaches the slide, the tissue has already been fixed, processed, embedded, sectioned, stored, and sometimes retrieved. Each step can affect epitope accessibility and tissue integrity. For a broader overview of upstream tissue handling, Boster’s IHC and ICC/IF sample preparation guide is a useful reference.
FFPE and frozen sections preserve tissue differently. FFPE tissue is fixed, dehydrated, cleared, embedded in paraffin, and sectioned. This helps preserve architecture, but formalin fixation can create protein crosslinks that mask epitopes. Frozen tissue is sectioned at low temperature with less chemical processing, which may better preserve sensitive targets but often produces less crisp morphology and requires more careful handling. In many laboratories, tissue preparation protocols also differ depending on whether the workflow prioritizes morphology or preservation of native biomolecules such as enzymes, lipids, or nucleic acids.
Before choosing, ask what the stain needs to prove: clear tissue architecture, fixation-sensitive antigen preservation, antibody compatibility, retrieval tolerance, long-term storage, detection method, or workflow consistency across a sample set.
FFPE sections are usually the better choice when morphology and spatial context are central to interpretation. Formalin fixation and paraffin embedding help preserve tissue architecture, making it easier to read staining in relation to tumor margins, glandular structures, stromal regions, immune infiltration, necrosis, or cell localization.
FFPE is often preferred when you need clear morphology, long-term sample storage, archived clinical or animal tissue blocks, routine chromogenic IHC such as DAB staining, consistent processing across many samples, pathology-style review, or antibodies validated for IHC-P/FFPE tissue. In many clinical diagnostics workflows, formalin-fixed paraffin-embedded tissue sections remain the standard because they support long-term archiving and reproducible interpretation across large cohorts of tissue samples.
The main trade-off is antigen masking. Formalin fixation can reduce antibody access to the target epitope, so FFPE sections often require heat-induced epitope retrieval or enzymatic retrieval. If you are deciding which retrieval approach fits your target, Boster’s guide to HIER vs. enzymatic antigen retrieval in IHC is a natural next step.
Retrieval should not be treated as a small adjustment. A citrate-based pH 6 buffer may work well for some targets, while Tris-EDTA pH 9 retrieval may perform better for others. Commonly used antigen retrieval buffers include sodium citrate buffer, EDTA buffer, and Tris-EDTA buffer, depending on the target antigen and the degree of crosslinking introduced during formaldehyde fixation. If retrieval is too weak, staining may be faint or absent. If it is too harsh, tissue damage, section lifting, or background staining may increase.
In some diagnostic immunohistochemistry workflows, optimization of heat induced epitope retrieval conditions is especially important when evaluating membrane-associated markers, stromal proteins, or vascular structures such as blood vessels in archived FFPE tissue sections.
Frozen sections are useful when preserving the antigen or tissue chemistry matters more than achieving the cleanest morphology. Because frozen tissue avoids the dehydration, clearing, paraffin embedding, and often harsher retrieval steps used in FFPE workflows, it can be a better option for targets that do not tolerate formalin fixation or heat-based retrieval well.
Frozen sections may be the better choice when the antigen is fixation-sensitive, lipid preservation is important, enzyme activity is part of the readout, rapid tissue processing is needed, harsh retrieval may damage the target, the antibody is validated for frozen tissue, or the workflow is IF-based.
Proper handling of Frozen Tissue often begins immediately after collection. Many laboratories use liquid nitrogen to rapidly preserve snap frozen tissue, followed by storage in ultra-low temperature freezers to minimize protein degradation and maintain native antigen structure before sectioning. This approach is commonly used in translational studies and cancer research involving fragile or rapidly changing biomarkers.
The trade-off is handling reliability. Frozen sections are more fragile and more dependent on controlled freezing, storage, sectioning, and staining conditions. Common issues include ice crystal artifacts, folding, cracking, uneven morphology, drying, and section detachment during staining. If tissue loss is already a recurring problem, Boster’s article on why tissue sections fall off during IHC can help separate slide adhesion issues from antibody or detection problems.
Frozen sections may improve weak FFPE staining only when the weak signal is caused by antigen masking, antigen loss, or damage during FFPE processing.
| Decision factor | Choose FFPE if... | Choose frozen sections if... |
|---|---|---|
| Morphology | Tissue architecture is critical | Some distortion is acceptable |
| Antigen preservation | The target tolerates fixation | The target is labile or fixation-sensitive |
| Antibody validation | The antibody is validated for IHC-P/FFPE | The antibody is validated for frozen sections |
| Storage | Long-term storage or archived blocks are needed | Controlled frozen storage is available |
| Lipids / enzymes | These are not the main readout | Lipids or enzyme activity must be preserved |
| Retrieval | Retrieval can be optimized | Retrieval should be mild or avoided |
| Detection method | Routine DAB or pathology-style IHC is planned | IF, rapid staining, or special preservation is needed |
| Workflow reliability | Standardized processing across many samples is needed | Freezing, sectioning, and storage can be tightly controlled |
A practical rule: choose FFPE when morphology, storage, and workflow consistency drive the experiment. Choose frozen sections when antigen preservation or native tissue state is the priority.
Tissue type changes how you should interpret common IHC problems. In FFPE samples, weak or no staining may come from over-fixation, under-retrieval, or an antibody that is not validated for FFPE tissue. Before replacing the antibody, check fixation history, retrieval buffer, retrieval pH, heating conditions, and antibody validation data. For a focused checklist, see Boster’s guide to weak or no staining in IHC.
Optimization should include both the primary antibody concentration and the detection chemistry used downstream. Some workflows rely on secondary antibody systems linked to horseradish peroxidase or alkaline phosphatase to improve visualization and signal amplification in low-abundance targets.
High background in FFPE can come from over-retrieval, tissue damage, endogenous enzyme activity, incomplete blocking, or detection system issues. If the signal is present but the slide is difficult to read, Boster’s guides to high background in DAB staining and non-specific staining in IHC can help separate sample-related issues from antibody or detection-related problems.
In chromogenic workflows, factors such as enzymatic conjugate stability, blocking efficiency, and substrate development can influence the final readout. For example, DAB detection relies on biocatalytic precipitation to generate a visible signal, while other chromogenic techniques may use different substrates depending on the desired contrast and sensitivity.
In frozen sections, poor staining may come from freeze artifacts, uneven fixation, drying, fragile tissue structure, or section lifting. Background may increase when damaged or partially lifted tissue retains reagents unevenly, or when endogenous enzyme activity is preserved in HRP- or AP-based chromogenic detection. Charged slides or a carefully selected post-fixation step may help, but these should be optimized around the antigen rather than applied automatically.
Some IF workflows using fluorescent antibodies or fluorophore-conjugated antibodies may perform better in frozen tissues, particularly when preserving native protein conformation is essential for accurate antigen-antibody interactions. In these cases, fluorescence-conjugated antibody staining may reduce the need for additional secondary reagents and preserve finer localization detail within the tissue section.
FFPE and frozen results should not be compared as if they are interchangeable. A staining difference may reflect true biology, but it may also reflect fixation, retrieval, processing, storage, or section quality.
Frozen sections can help with fixation-sensitive antigens, but they do not solve low antibody specificity, poor tissue handling, or low target abundance.
An antibody validated for IHC-P may not perform the same way on frozen sections, and the reverse is also true. If you are still selecting reagents for the workflow, Boster’...

A comprehensive guide to longitudinal IHC studies: from designing sampling schedules and selecting marker panels to interpreting dynamic biomarker changes and aligning tissue findings with clinical outcomes.
Why Longitudinal IHC? The Case for Temporal Tissue Analysis
Immune Profiling Over Time: Revealing Treatment Response Patterns
Quantifying Marker Dynamics: Statistics Over Impressions
Inferring Functional Cell States and Differentiating Benign from Malignant Phenotypes
Study Design Considerations for Longitudinal IHC
Multi-modal Integration: Aligning IHC with Imaging, Genomics, and Metabolomics
Clinical Implications: Therapy Response, Prognosis, and Biomarker Validation
Pitfalls, Limitations, and Reproducibility in Longitudinal IHC
Key Takeaways for Longitudinal IHC Study Design

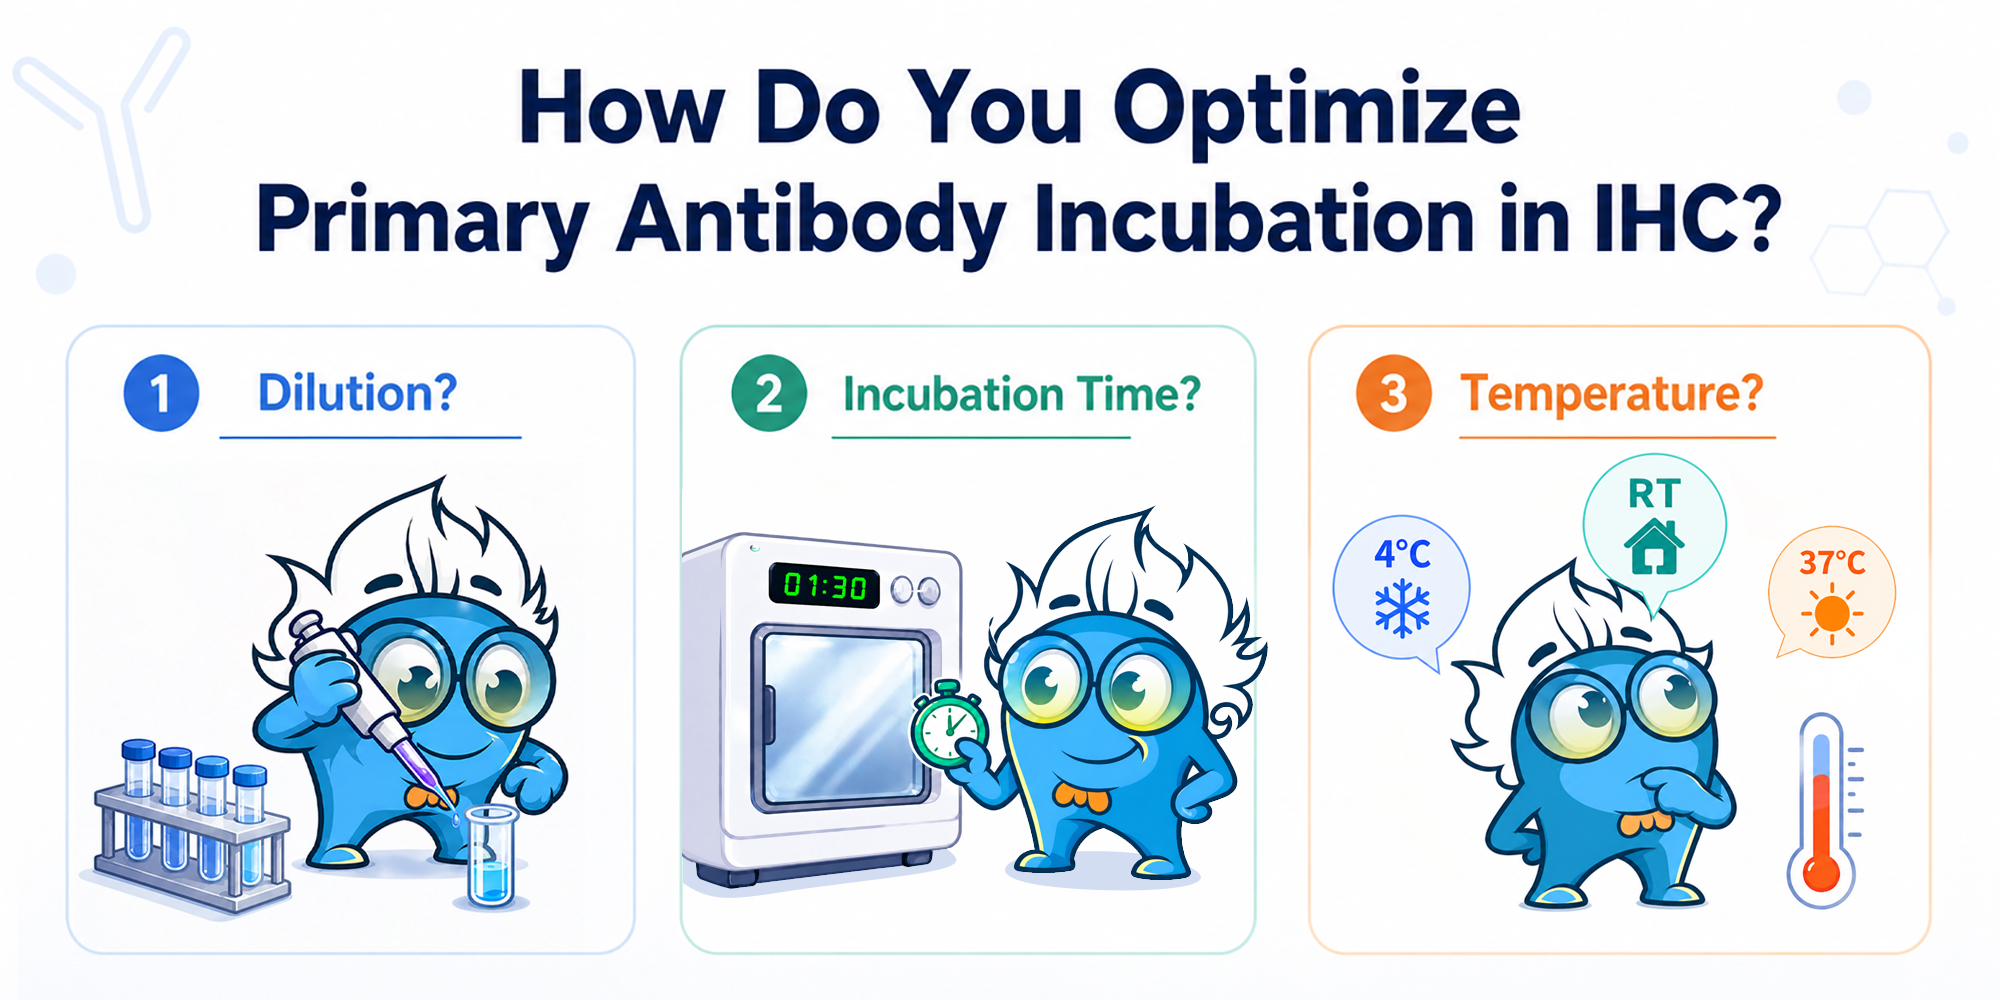
When IHC staining is weak, noisy, or too intense, the next step is not always to replace the primary antibody. In many cases, the result can be improved by adjusting three primary antibody incubation conditions: dilution, incubation time, and temperature.
These...
When tissue sections fall off during IHC staining, the fastest way to find the cause is to identify the step where detachment begins.
In most cases, tissue loss has more to do with slide adhesion, drying, antigen retrieval, sample preparation, or handling than with the antibody itself. A section that comes off early in the workflow, during retrieval, or late in the run is usually pointing to a different kind of problem.
If you want to place this issue in the context of the broader workflow, it helps to start with the basics of IHC staining and the overall IHC protocol before narrowing in on section loss in a typical histology lab environment.
If detachment happens early in the workflow, the section may not have been fully secured to the slide before staining began. In addition to deparaffinization or rehydration, early section loss can also be related to poor section quality, folds, uneven section thickness, or incomplete drying after mounting.
In general, frozen sections prepared using OCT compound and liquid nitrogen are more likely to show detachment at these earlier stages, while formalin fixed paraffin embedded tissue sections and workflows more often remain intact until antigen retrieval.
This is one of the most common failure points, especially in FFPE IHC. Heat-induced epitope retrieval, also known as heat induced antigen retrieval or antigen unmasking, is essential in many workflows, but it also puts substantial physical stress on the section. If tissue loss starts here, the retrieval conditions may be too aggressive for that sample, or the tissue may already have been weakened earlier in processing, mounting, or drying. This can include use of a pressure cooker, water bath, or other heating systems, where thermal shock and rapid temperature shifts may weaken adhesion. Buffer choice also matters, including citrate buffer and high pH retrieval solutions, since pH matters in maintaining tissue integrity.
In some cases, switching to enzyme digestion or protease digestion may provide gentler alternatives to harsh heat-based retrieval.
When retrieval seems to be the breaking point, it is often worth reviewing antigen retrieval, the tradeoffs between HIER and PIER, and, where relevant, how sodium citrate buffer is being used.
If sections begin to come off during washes or incubation steps, the tissue may already have been weakened earlier in the run. At this stage, strong buffer flow, repeated agitation, or direct dispensing onto the tissue can make section loss more visible, but these are often not the only cause. Sometimes, improper handling using slide racks can contribute.
Using appropriate wash buffers such as PBS buffers prepared with deionized water helps maintain consistency, while avoiding waterbath contamination is critical when sections are floated before mounting.
If sections remain attached until counterstaining, dehydration, or mounting, the damage may have built up gradually through the run. Steps like immunoperoxidase staining, DAB reaction, and use of various detection reagents or signal amplification systems can stress already fragile tissue. In those cases, it can help to revisit how counterstains and later processing steps affect already stressed tissue.
If the section is not firmly attached to the slide, every later step becomes less forgiving. Detachment that starts at the edges or in thinner areas often points to weak initial adhesion.
For more demanding samples, positively charged or coated slides, a hydrophobic barrier or proper mounting techniques can help improve retention. This is especially useful for fragile paraffin sections or tissues that will go through more rigorous retrieval conditions.
A section can look attached and still not be fully set. Using a slide warmer ensures proper drying before staining begins and reduces the risk of tissue detachment during downstream steps. If drying is insufficient, residual moisture can weaken attachment once the tissue is exposed to solvents, heat, or retrieval buffer.
Common starting points include 60°C for about 1 hour or 56°C overnight, though exact conditions vary by tissue and lab workflow. The goal is not simply to warm the slide, but to make sure the section is genuinely secured before staining begins.
Antigen retrieval is necessary for many targets, but stronger is not always better. Excessive heat, extended retrieval time, or unsuitable buffer high-pH conditions can all increase the risk of section loss, especially in delicate samples. Fragile tissue samples may require milder retrieval approaches rather than standard protocols.
This pattern is especially common in FFPE workflows, where sections may remain intact through earlier steps and then fail under retrieval stress. It is also where upstream choices begin to matter. If tissue integrity was already weakened during fixation or processing, retrieval often becomes the step where that weakness shows up.
Fragile, fatty, decalcified, or otherwise compromised tissues are especially likely to detach under harsh retrieval conditions. In those cases, gentler retrieval conditions are often more useful than simply repeating the same standard protocol.
The problem does not always start on the staining bench. Weak fixation, over-fixation, harsh decalcification, or rough sectioning can all reduce tissue morphology integrity before IHC even begins.
Under-fixation can leave tissue cohesion too weak to withstand downstream handling, while over-fixation can make the section more brittle. If the issue seems to begin upstream of staining, it usually makes more sense to review sample preparation and the main fixative types used in IHC and ICC than to keep changing staining conditions alone.
Directly dispensing of buffers, onto the section, washing too forcefully, or handling slides too roughly can all increase tissue loss, especially after retrieval. These issues may also contribute to background staining or increased non-specific binding, especially if blocking and washing steps are not optimized.
At the same time, these steps often act on tissue that is already unstable. In practice, washing may be the point where section loss becomes obvious rather than the only reason it happens.
Some tissues are simply less tolerant of heat, agitation, and repeated solution changes. If the problem appears only in certain sample types while the rest of the workflow performs normally, tissue-specific fragility should be part of the troubleshooting logic.
For example, fatty tissues tend to have looser structural support, while decalcified tissues may lose some of the integrity they had before processing. In both cases, gentler handling and milder retrieval conditions may be necessary from the start.
When sections fall off during IHC, do not change everything at once. Start with the factor that best matches the step where failure occurs.
| If your result looks like this | Better next move |
|---|---|
| Routine FFPE tissue, first-round setup | Start with HIER |
| Weak signal, but tissue remains intact | Optimize HIER first |
| Heat damages morphology or section stability | Test enzymatic retrieval |
| Literature or antibody guidance supports protease digestion | Consider enzymatic retrieval earlier |
| Enzyme treatment over-digests tissue | Reduce digestion strength or reassess method fit |
A sensible troubleshooting order is:
A useful practical distinction is this: if sections begin to lift early in the workflow, adhesion, section quality, or drying are usually the first place to look. If they remain stable until retrieval and then start to fail, retrieval intensity or tissue fragility becomes a more likely explanation.
Once section retention is under control, broader assay quality questions are usually better addressed through IHC optimization, IHC troubleshooting, and well-designed IHC controls.
Many detachment problems begin long before antibody incubation starts. A few preventive checks can reduce failure later in the run:
Proper antibody application with the right antibody concentration, along with validated primary antibody, secondary antibody, or monoclonal antibody systems, also helps maintain consistency. Blocking steps targeting endogenous peroxidase and endogenous biotin can further improve staining quality.
These steps are simple, but they often make the difference between a stable section and one that begins to lift halfway through the protocol.
If the section is physically coming off the slide, start with section stability. Markers such as proliferating cell nuclear antigen are commonly used, but antibody performance may matter later, but it is usually not the first issue here.
Washing may be where the section comes off, but the underlying cause often started earlier.
If you change slide type, drying conditions, retrieval settings, and wash method all in one run, it becomes much harder to see what actually solved the problem.
Why do tissue sections often fall off during antigen retrieval?
Because retrieval combines heat and chemical stress. If adhesion or tissue integrity is already marginal, retrieval is often the step that exposes it. This is especially common in FFPE workflows.
When should I consider using coated or charged slides?
They are often worth considering for fragile tissues, difficult paraffin sections, or workflows that require more demanding retrieval conditions.
Can fixation affect whether sections stay on the slide?
Yes. Fixation and tissue processing both affect tissue integrity, which in turn affects how well the section holds up during staining.
Do all tissues need charged slides for IHC?
Not necessarily. Many tissues stain well without them, but charged or coated slides can be especially helpful when you are working with fragile samples or retrieval-heavy workflows.
How can I tell whether the problem is poor drying or harsh retrieval?
The timing often helps. If the section begins to lift early in the workflow, drying, slide adhesion, or section quality are more likely. If it stays stable until retrieval and then detaches, retrieval conditions or tissue fragility are usually better places to start.
When tissue sections fall off during IHC, the most useful question is simple: At what step did the section start to detach? In most cases, the answer points back to slide adhesion, section drying, retrieval intensity, tissue integrity, or physical handling.
Once section retention is under control, the rest of IHC optimization becomes much more straightforward. And in many cases, the most effective fix is not a dramatic protocol change, but a better match between the tissue, t...

In most FFPE IHC workflows, antigen retrieval through HIER is the better first retrieval method. The more useful question is not whether antigen retrieval matters, but whether heat-based epitope retrieval is enough for your target and tissue—or whether enzymatic retrieval is the smarter next step.
That distinction matters because weak or missing staining is not always an primary antibody problem. It may reflect a retrieval method that does not match the fixation history, tissue fixation approach such as formalin fixation, tissue condition, or epitope behavior. At the same time, changing methods too early can create unnecessary trial-and-error. If heat-based retrieval still preserves tissue integrity in formalin-fixed paraffin-embedded samples, it usually makes more sense to optimize that setup before moving to enzyme digestion. If heat is already compromising morphology or section stability in tissue sections, enzymatic retrieval becomes a more logical test.
If you need a broader refresher on why retrieval is needed at all, this article should complement—not repeat—your background guide on antigen retrieval in immunohistochemical assays.
For routine FFPE IHC staining, HIER is usually the most practical place to start because it is easier to standardize within repeatable IHC protocols. If the initial stain is weak, you can still optimize several variables within the same retrieval strategy, including buffer choice such as sodium citrate, pH, heating strength, and retrieval time.
That makes HIER especially useful when you are building a stable workflow across multiple tissues, projects, or staining runs in molecular biology applications. A weak result after HIER does not automatically mean heat retrieval was the wrong choice. In many cases, it simply means the conditions were too mild, too short, or not well matched to the target.
This is also why HIER fits naturally into a broader IHC sample preparation and immunoassay protocols workflow. If heat retrieval is directionally correct, refining the setup is often more productive than switching method classes too early.
Enzymatic retrieval becomes more worth testing when heat is part of the problem rather than part of the solution.
In these cases, enzymatic retrieval is not just an alternative for the sake of variety. It is a different strategy for antigen unmasking while reducing thermal stress on the sample.
This is also where upstream sample conditions matter more. Retrieval choice is easier to judge when you consider the broader context of fixatives used in IHC and ICC and overall pre-staining conditions. If fixation or sample handling is already working against epitope accessibility, retrieval performance can be harder to interpret and may contribute to a broader staining issue.
One of the most common mistakes in IHC optimization is treating a weak first result as proof that the retrieval method itself was wrong.
If you used HIER and the tissue still looks intact, do not jump to enzyme digestion immediately. First ask a narrower question: did you test HIER broadly enough to make that call? If not, optimizing within HIER is often the faster and cleaner next step, including adjusting antibody dilution, PBS buffer conditions, or detection reagents.
By contrast, if HIER is clearly reducing morphology quality, weakening section stability, or making the workflow harder to reproduce, that result tells you more. In that situation, the next move should not be “more heat, but different.” It should be a different retrieval logic.
This is also where retrieval should remain part of a broader troubleshooting mindset. A weak or negative stain may involve retrieval, but it may also reflect secondary antibody performance, signal amplification limits, or blocking issues such as endogenous peroxidase or endogenous biotin interference. These factors can contribute to background staining or poor signal clarity.
In most routine FFPE workflows, optimizing HIER first is still the more practical path. But not every project has the time for a broad HIER matrix covering multiple buffers, pH conditions, and retrieval windows.
If you are working under time pressure and already have strong literature support, prior validation data, or known tissue-specific reasons to avoid heat-heavy optimization, testing enzymatic retrieval earlier may be the more efficient choice. This is often relevant in studies i...

Looks right doesn’t mean it is—identify and fix non-specific staining in IHC.
Immunohistochemistry (IHC) visualizes protein expression and localization within intact tissues, providing unique spatial data unavailable from
Western blotting or bulk RNA methods alo...