This website uses cookies to ensure you get the best experience on our website.
- Table of Contents

Immunohistochemistry (IHC) is a vital technique in biomedical research and clinical diagnostics, enabling the visualization and localization of specific proteins within tissue samples. In this blog, we outline the different types of IHC staining, including direct and indirect approaches, immunofluorescence, and chromogenic techniques. We also discuss the general process of IHC staining. This overview serves as an introductory guide for understanding and implementing IHC protocols. In practice, accurate interpretation of IHC staining often depends on multiple variables—such as fixation quality, antibody specificity, and tissue morphology—which can be critically assessed through expert Pathology Review Service, including how techniques like Multiplex Assay Services expand the utility of IHC by enabling the simultaneous analysis of multiple protein targets within a single tissue sample.
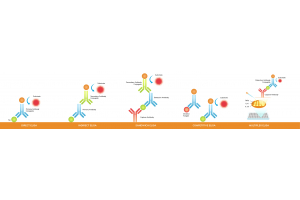
Immunohistochemistry (IHC) staining is broadly categorized into several types based on the staining mechanism and the visualization methods used.
Involves the direct conjugation of the primary antibody with a detectable label (e.g., enzyme, fluorophore). This method is straightforward but may result in lower sensitivity compared to indirect methods.
Uses a secondary antibody that recognizes the primary antibody. The secondary antibody is conjugated to a detectable label, amplifying the signal from the primary antibody. This method enhances sensitivity and allows signal amplification.
Uses fluorophore-conjugated antibodies to visualize antigens under a fluorescence microscope. This technique is valuable for studying cellular localization, protein-protein interactions, and co-localization studies.
When immunofluorescence expands into multicolor or multiplex panel design, fluorophore choice becomes a major determinant of image quality. This guide on how to choose fluorophores for multiplex IF is especially useful for matching channel brightness to target abundance, separating neighboring spectra, and validating bleed-through with single-stain controls before interpreting overlap.
Utilizes enzyme-substrate reactions to produce a visible color change at the site of antibody-antigen binding. Commonly used enzymes include horseradish peroxidase (HRP) and alkaline phosphatase (AP). This method is widely used in clinical pathology and research.
For chromogenic workflows that use HRP/DAB detection, background control is often the key determinant of interpretability. This practical guide on troubleshooting high background in DAB staining is especially useful when signal is present but contrast is poor or slides look diffusely dirty.
These types of IHC staining methods provide flexibility in studying various aspects of protein expression and localization in tissues, catering to different research and diagnostic needs. For studies requiring simultaneous detection of multiple biomarkers, a multiplex IHC service can offer enhanced analytical depth within a single tissue section.
The general steps involved in immunohistochemistry (IHC) staining typically are described below. You can also browse available IHC reagents from Boster here.
Once detection moves into multiplex IF, image quality can break down quickly if bleed-through, background, or saturation are not separated from true biology. This troubleshooting guide for multiplex IF is a practical follow-up for using single-stain controls, no-primary controls, and fast exposure checks to identify the real source of a messy panel before changing the whole staining workflow.
These steps may vary slightly depending on the specific protocol, target antigen, and detection method used in the IHC staining process. Each step is crucial for obtaining reliable and reproducible results in immunohistochemistry studies. For a more comprehensive protocol, please visit our IHC Principle and IHC Protocol pages.
If your staining still looks unexpectedly faint after following the standard workflow, this guide on weak or no staining in IHC is a useful next step for checking whether the bottleneck comes from fixation, retrieval, antibody performance, or detection sensitivity.
If you’d like to learn more about IHC, check out our IHC Technical Resource Center and download our IHC eBook, which discusses the IHC principle and protocol, and provides troubleshooting tips for your IHC experiment.
Mastering the intricacies of immunohistochemistry (IHC) staining techniques empowers researchers with powerful tools for elucidating protein expression and localization in tissues. Each step, from tissue preparation to antibody detection, plays a crucial role in ensuring accurate and reproducible results. By understanding the principles behind direct and indirect staining methods, as well as the nuances of immunofluorescence and chromogenic approaches, you will be able to tailor protocols to meet your specific research needs.
If you’d like to learn more about IHC, check out our IHC Technical Resource Center and download our IHC eBook, which discusses the IHC principle and protocol, and provides troubleshooting tips for your IHC experiment.