This website uses cookies to ensure you get the best experience on our website.
- Table of Contents

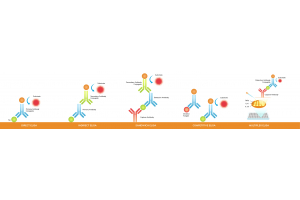
Multiplex immunofluorescence, or multiplex IF, often looks “simple” on paper—until channels start bleeding into each other, weak targets disappear, or background forces you to crank exposure. In reality, most multiplex failures come from three upstream issues: channel planning, where brightness is mismatched to abundance, overlap, including spectral spillover and crosstalk, and missing controls, meaning no single-stain proof. The goal is not “more color,” but clean, interpretable signal with defensible imaging rules—so your colocalization reflects biology, not artifacts.
This post is a practical workflow for fluorophore selection in multiplex IF: plan channels by abundance, prevent bleed-through, and validate with controls. It’s written as a microscope-side SOP—decision rules plus checks—not a fundamentals-only overview. If you want to align upstream variables first, start here: sample preparation for IHC/ICC/IF and cell/tissue fixation.
To choose fluorophores for multiplex immunofluorescence and prevent bleed-through, (1) assign the brightest channel to the lowest-abundance target, (2) keep channels spectrally separated, (3) verify spillover with single-stain controls, and (4) optimize imaging settings per channel, then keep them constant within the same channel for any group/sample comparisons.
To make the intent clear: this post is a multiplex IF workflow—channel planning, single-stain spillover checks, and within-channel imaging consistency for comparisons. For fundamentals—what a fluorophore is, spectra basics, and selection basics— see how to choose the right fluorophore.
Plan your panel in this order: list targets → estimate abundance, low/medium/high → assign channels by brightness tier → re-check overlap → confirm with controls. If background is stubborn across all channels, align upstream variables first especially fixation and follow a baseline protocol.
Weak targets disappear when you force them into a dim channel and compensate with long exposure or high gain—this also increases bleed-through and background. A simple rule prevents many failures: assign the brightest channel to the lowest-abundance marker.
| Target abundance | Channel assignment | Why it works |
|---|---|---|
| Low | Brightest channel | Avoid long exposure/high gain that amplifies background and spillover. |
| Medium | Medium-to-bright channel | Balance SNR with separation from neighbors. |
| High | Stable/clean channel | Prevents overexposure and bleed-through into adjacent channels. |
Copy-ready checklist:
Target / abundance, low–med–high • primary species/host • compartment, N/C/M • assigned channel, bright/medium/clean •
single-stain control required • notes, autofluorescence risk, imaging mode, scan time.
Bleed-through usually comes from spectral overlap plus broad detection windows plus overexposure in a bright channel. The fix is not “swap dyes randomly,” but separation + exposure discipline + controls. Keep your immunofluorescence protocol stable, and validate changes one at a time. If you want a structured way to isolate causes, use the troubleshooting workflow.
| Rule | What to do |
|---|---|
| Separate channels | Avoid neighboring fluorophores for markers you interpret together. |
| Don’t overexpose bright channels | Overexposure is the fastest route to spillover and false colocalization. |
| Run single-stain controls | Validate spillover under your exact microscope settings. See controls you should know. |
| Lock imaging rules correctly | You do not need identical settings across different channels. Optimize each channel, but keep settings constant within the same channel for group/sample comparisons. |
Photobleaching becomes limiting in confocal rescans, tile scans, and Z-stacks. Minimize illumination where possible, avoid unnecessary rescans, and don’t force fragile signals into long-exposure conditions. For stepwise improvements without changing everything at once, follow IHC/IF optimization steps.
| What you see | Most likely cause | Fix (do first) |
|---|---|---|
| Colocalization everywhere | Bleed-through or overexposure | Single-stain controls; reduce bright-channel exposure; increase separation. |
| Low target barely visible | Low-abundance target assigned to a dim channel | Move low target to brightest channel; avoid long exposure; rebalance. |
| Signal fades during acquisition | Photobleaching | Reduce exposure; minimize rescans; optimize acquisition sequence. |
| High background across channels | Prep/fixation/autofluorescence plus pushed exposure | Align sample preparation; reduce exposure; troubleshoot one variable at a time. |
| One channel looks “dirty” | Bandwidth/filter issue or neighbor spillover | Narrow detection; lower neighbor intensity; confirm with controls. |
| Item | Why it matters |
|---|---|
| ☐ Single-stain controls for every channel | Proves whether spillover exists under your imaging settings. |
| ☐ Low-abundance targets in the brightest channel | Prevents long exposure/high gain that drives background and crosstalk. |
| ☐ No overexposure in bright channels | Overexposure creates false positives and spillover. |
| ☐ Channel-specific settings locked within each channel for comparisons | Ensures group differences reflect biology, not acquisition changes. |
| ☐ Overlap re-checked after any marker change | Small panel changes can reintroduce spillover. |
Assign the brightest channel to the lowest-abundance marker, keep channels spectrally separated, validate with single-stain controls, and optimize imaging settings per channel—then keep settings constant within the same channel for comparisons. Keep a consistent immunofluorescence staining protocol, sometimes called an IF staining protocol, across the experiment.
No. Optimize exposure, gain, or laser settings per channel for clean signal. For group-to-group comparisons, keep those settings constant within the same channel across samples.
Bleed-through is driven by spectral overlap, broad detection windows, and overexposure. The fastest fixes are tighter channel separation, lower exposure in the brightest channel, and single-stain controls.