This website uses cookies to ensure you get the best experience on our website.
- Table of Contents
ELISA can be deceptively “clean.” The standard curve looks smooth, duplicates are close, and the plate reads without errors—yet the final concentrations don’t make biological sense, shift between runs, or fail to reproduce across days or operators.
In most cases, the issue isn’t pipetting skill. It’s experimental design: missing controls, standards that don’t match the sample range, dilution choices made without a quick pre-check, or plate reading/recording steps that aren’t locked down. In other words, an ELISA can look correct and still be wrong. If that pattern sounds familiar, it often overlaps with the avoidable setup errors covered in 5 Pitfalls to Avoid for ELISA.
This checklist is built to prevent that. Use it before you run the plate to reduce re-runs, protect scarce samples, and make your results easier to defend, share, and replicate. At the end, you’ll find copy-paste templates and a link to an online 4PL/5PL ELISA data analysis tool to standardize analysis. If you want a broader bench reference before you start, Boster’s ELISA Technical Resource Center is also a useful starting point.
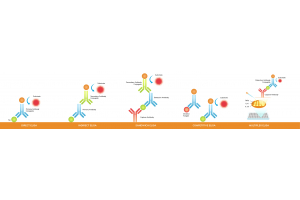
If you are still deciding on assay format before you even get to plate setup, it can also help to review Which ELISA Is for You or the overview of direct, indirect, sandwich, competitive, and multiplex ELISA formats, since assay format and downstream experimental design are tightly connected.
ELISA accuracy is mostly determined before you ever touch the plate reader.
Helpful background references:
Controls are what separate a plate that merely “ran” from a result you can actually trust. If you want a deeper breakdown of how blank, negative, and spike-related controls differ in practice, see ELISA Controls That Actually Matter. For a broader cross-assay reference, Boster also has a practical guide on how to design positive and negative controls.
Purpose: Defines the baseline of the system and instrument (often used for background subtraction).
How to run it: Add assay diluent/sample buffer (no analyte, no sample) and process through all steps like any other well.
Common mistake: Skipping steps in the blank well—then it’s not comparable.
Purpose: Detects non-specific binding and unexpected signal from the sample matrix.
How to run it: Use a sample known to lack the analyte (if available) or use diluent as a system negative.
Purpose: Confirms the full assay system worked (capture, detection, conjugate, substrate, and washes).
How to run it: Use a known positive sample or a mid-range QC point from your standard series.
Best practice: Track the same positive control across runs to spot drift early. If you are working with a validated commercial kit, it is also worth checking the available
ELISA validation information
so your control strategy is aligned with the assay’s intended performance.
Purpose: Quantifies how the sample matrix (serum, plasma, lysate, media) affects signal and recovery.
Two common approaches: (1) Matrix blank (analyte-free matrix diluted like your sample) and/or (2) Spike-and-recovery.
This becomes even more important when sample handling itself may be contributing noise, which is why it helps to review Boster’s
ELISA sample preparation guide
or the related post on
sample processing for ELISA testing
before you lock your workflow.
| Control type | Wells | Contents | Dilution | Expected outcome | If it fails |
|---|---|---|---|---|---|
| Blank | Diluent only (run through all steps) | 1× | Very low OD | Check wash, contamination, substrate | |
| Negative | Negative sample or matrix-matched diluent | Same as sample | Near blank / below LLOQ | Check matrix effects or non-specific binding | |
| Positive | Known positive sample or mid-range QC point | 1× | Falls in mid curve | Confirm steps and reagent integrity | |
| Matrix | Matrix blank and/or spike-and-recovery | Same as sample | Background explained / recovery acceptable | Adjust dilution, buffer, sample prep |
Tip: If your sample isn’t a clean buffer, include at least one matrix control.
Don’t default to the widest standard range possible. Choose a range that matches your samples. The fastest method is a micro pre-check with 2–3 representative samples. If you need a refresher on curve setup itself, see how to generate an ELISA standard curve, guidelines for preparing ELISA standards, or Boster’s post on how to perfect your ELISA standards.
When the main uncertainty is sample concentration rather than standard preparation, Boster’s guide to deciding ELISA dilution ratio is a useful companion reference.
| Where it lands | What it means | What to do next |
|---|---|---|
| Noise floor (very low OD) | Signal is near background; quantification is unstable. | Use a lower dilution (more concentrated sample), optimize sample prep, or select a more sensitive kit/range. |
| Quantifiable mid-range | Best region for accurate and reproducible concentrations. | Lock your dilution and keep it consistent across samples and runs. |
| Plateau (very high OD) | Signal is saturating; concentration estimates become unreliable. | Dilute more (reduce sample load) so readings fall back into the quantifiable region. |
Quick rule: aim for most samples in the middle of the curve. If points are stuck at the floor or the plateau, adjust dilution or range before running a full plate. For cases where low-end detectability is the real issue, Boster’s article on sensitivity vs. minimum assay range in ELISA testing can help clarify whether the problem is dilution, curve placement, or assay sensitivity itself.
A simple, repeatable dilution approach:
If your early screening suggests the analyte is genuinely low-abundance, it may be worth looking beyond dilution strategy alone and checking whether a high-sensitivity ELISA kit would be a better fit for the target and matrix you are working with.
| Sample ID | Matrix type | Target dilution | Pre-dilution (Y/N) | Final volume | Notes |
|---|---|---|---|---|---|
| Serum / plasma / lysate / media | Viscous, precipitate, spin required? |
You don’t need perfect timing—you need consistent timing. Lock down the read window and keep it the same across wells and runs. If you are seeing unstable color development or inconsistent OD behavior, Boster’s Picokine ELISA troubleshooting and Picokine ELISA optimization resources are useful troubleshooting references.
Replicates should be enough to measure variability without wasting wells:
| Row\Col | 1 | 2 | 3 | 4 | 5 | 6 | 7 | 8 | 9 | 10 | 11 | 12 |
|---|---|---|---|---|---|---|---|---|---|---|---|---|
| A | Std1 | Std1 | Std2 | Std2 | ||||||||
| B | Std3 | Std3 | Std4 | Std4 | ||||||||
| C | Blank | Blank | Neg | Neg | ||||||||
| D | Pos | Pos | S1 (1:10) | S1 (1:10) | ||||||||
| E | ||||||||||||
| F | ||||||||||||
| G | ||||||||||||
| H |
Note: If you don’t want to show the full 12×8 map in the blog, keep this as an internal template and replace this block with a short bullet list of layout rules.
Many ELISA standard curves are sigmoidal—this is why 4PL and 5PL models are widely used. The goal isn’t to debate which model is “better,” but to use a consistent method and rules across runs so results are comparable. If you want the full step-by-step interpretation workflow, Boster’s guide to analyzing ELISA data and calculating results pairs naturally with the calculator below.
Online ELISA Data Analysis Tool (4PL/5PL)
Optional instructions page: ELISA Data Analysis
| Item | Why / Notes |
|---|---|
| ☐ Controls planned | Blank, Negative, Positive, plus at least one matrix control. |
| ☐ Dilution plan tested | Quick 2–3 dilution pre-check on representative samples. |
| ☐ Standard curve range matches samples | Most samples will land in the mid-curve quantifiable range. |
| ☐ Timing fixed | Define substrate/stop/read windows and keep them consistent. |
| ☐ Plate map final | Sample IDs + dilutions + controls mapped before pipetting. |
| ☐ Analysis standardized | Use 4PL/5PL consistently (don’t eyeball curves). |
Looking for kits for your targets? Explore ELISA kits. If faster turnaround matters, you can also review Boster’s Quick ELISA Kits; if you need more flexibility for assay setup, see EZ-Set ELISA kits and antibody pairs. And if you’d rather outsource method setup or sample testing, Boster also offers ELISA testing service and ELISA assay development services.
For visitors who are still in evaluation mode rather than ready to purchase a specific kit, a final soft next step could be how to choose a good ELISA kit. If a promotion-first CTA makes sense for your campaign timing, you could also selectively surface Top 100 ELISA Kits - 40% Off in newsletter or landing-page versions, though I would keep that as a lighter mention in the blog itself.