This website uses cookies to ensure you get the best experience on our website.
- Table of Contents

ELISA results can look “clean”—tight duplicates and a smooth standard curve—and still be misleading. In practice, the most common failure is not pipetting technique, but controls that do not isolate the specific failure mode (system background, non-specific binding, matrix interference, or out-of-range samples). If you want a broader setup framework before drilling into controls, Boster’s ELISA experimental design checklist is a useful companion read.
This post focuses on four controls that most reliably de-risk interpretation:
And because professional users will ask: we also include dilution linearity / parallelism, which is often the fastest way to confirm (or rule out) matrix effects and hook/ULOQ issues. If you are looking for the full controls discussion in one place, this article also sits naturally alongside how to design positive and negative controls.
In this post, “Blank” means a process blank / zero standard: assay diluent (or standard diluent) run through the full workflow. That makes it your best indicator of system baseline (plate + buffers + wash + substrate/read). For readers who need to step back and re-check fundamentals, Boster’s ELISA principle and ELISA protocol pages are useful refreshers.
What a high blank typically indicates
First response
If elevated background is recurring rather than one-off, it may also help to compare your run against Boster’s Picokine ELISA troubleshooting and ELISA troubleshooting guide resources.
A negative control is intended to show the signal you get when the analyte should be absent—i.e., to detect non-specific binding / false positives. For professional readers, the gold standard is a true negative biological matrix (e.g., knockout, target-depleted, pre-immune, matched untreated control).
A practical hierarchy:
If your “negative” is only diluent, you can detect reagent/plate non-specificity, but you still cannot conclude your assay is selective in real sample matrix. That distinction is exactly why matrix-aware control design matters, especially when sample handling may already be influencing background. In that situation, Boster’s ELISA sample preparation guide and the related post on sample processing for ELISA testing are worth reviewing before you interpret “negative” wells too confidently.
Spike-and-recovery addresses the core professional question:
“Even if the curve looks good, is my measured concentration in this matrix trustworthy?”
Setup (minimal version)
Calculation:

Acceptance criteria: don’t hard-code one number
Many labs start with ~80–120% as a screening band, but professional validation typically defines acceptance criteria based on assay purpose and performance near LLOQ/ULOQ (often wider tolerance near the ends of the curve). The correct standard is the one you can defend for your use case and demonstrate during validation. If your team is still working through range interpretation, Boster’s article on the difference between sensitivity and the minimum level of assay range in ELISA testing is a strong companion piece here.
Fastest fixes if recovery fails
If the main uncertainty is where to start that dilution work, Boster’s guide to deciding ELISA dilution ratio helps connect recovery problems back to a more stable working dilution strategy.
Spike recovery is powerful, but dilution linearity (also called parallelism) is often an even faster check of whether matrix effects or out-of-range behavior are corrupting your result.
How to run it
What you want to see
Back-calculated concentration stays approximately consistent across dilutions (within your pre-defined tolerance). If it only “looks right” at one dilution but drifts at others, you likely have matrix interference, non-specific binding, or range issues.
Why professionals care
This is also where robust curve analysis matters. If you want a consistent way to compare back-calculated results across dilutions, Boster’s Online ELISA Data Analysis Tool (4PL/5PL) and its companion ELISA Data Analysis instructions can help standardize interpretation. For a fuller walkthrough, see how to analyze ELISA data and calculate results.
If you suspect samples may exceed the upper limit of quantification (ULOQ), you must verify results after additional dilution. In sandwich assays, extremely high analyte can produce hook effect, where signal paradoxically decreases and the sample appears falsely low. Readers who are seeing unusually compressed high-end signals may also find Boster’s post on ELISA troubleshooting for saturated signals helpful here.
Practical safeguard:
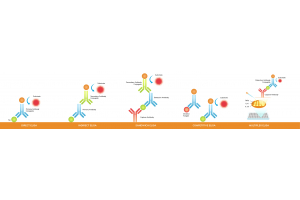
| Control | What it isolates | What “bad” often looks like | First response |
|---|---|---|---|
| Blank (process blank / zero standard) | System baseline | High baseline across plate | Wash/blocking, reagent freshness, timing consistency |
| Negative (matrix negative; true negative in matrix) | False positives / non-specific signal (specificity check) | Negative rises above blank meaningfully | Optimize antibody concentrations, blocking, wash stringency |
| Spike-and-recovery | Quant accuracy in matrix | Recovery low/high/inconsistent | Dilute, matrix-match standards, sample prep improvements |
| Dilution linearity / parallelism | Matrix effect + out-of-range behavior | Back-calculated concentration drifts with dilution | Choose working dilution, fix matrix effects, check range/hook |
ELISA controls are not checkboxes. Each one isolates a different failure mode:
If you only add one “extra” beyond blank/negative, add spike-and-recovery.
If you want the fastest professional check for silent failure, add dilution linearity / parallelism.
And if you are moving from troubleshooting into assay selection or execution, a natural next step is to explore Boster ELISA kits. For users who need a faster workflow, Boster also offers Quick ELISA Kits. If the bigger issue is matrix complexity or assay setup rather than kit choice alone, Boster’s ELISA testing service and ELISA assay development services are also relevant options.