This website uses cookies to ensure you get the best experience on our website.
- Table of Contents
A verification-first workflow to prevent ghost bands and high background.
Western blot “failures” are often pinned on antibodies, transfer, or blocking. But when you’re stripping and re-probing, the make-or-break step is simpler: whether round one antibodies are truly removed without damaging what you’re trying to detect next. The goal is a verification-first stripping protocol that keeps signal-to-background high—so round two reads like biology, not carryover.
If you want broader context (or want to move downstream after your workflow is solid), these internal hubs are designed to be your next clicks:
Stripping and re-probing is most useful when it replaces a full rerun—another gel, another transfer, and another antibody cycle—without compromising interpretability. The workflow below focuses on the two outcomes that matter most in practice: avoiding antibody carryover that becomes ghost bands, and preserving immobilized protein so your second-round signal doesn’t collapse into background.
Stripping is worth doing when reusing the membrane genuinely replaces a full gel/transfer cycle. But it can become a time sink when your first-round signal is already near the detection limit or your experiment requires strict quantitative comparability across conditions. When you’re unsure whether your problem is stripping-related or coming from upstream steps, it’s often faster to cross-check your baseline workflow against the Western blot troubleshooting library before you change stripping conditions.
Table 1. Strip & re-probe vs rerun: a decision guide
| Situation | Strip & re-probe is usually a good idea | Rerun is usually the safer choice |
|---|---|---|
| Sample amount | Sample is limited and lanes are precious | Sample is not limiting |
| Signal strength | First-round bands are clear and usable | First-round bands are weak or near background |
| Targets | You need two targets, or phospho → total | You need many targets across many rounds |
| Data requirements | Confirmatory readout or limited reprobing | Strict quantitation with minimal added variability |
| Risk tolerance | You can accept 1–2 reprobing rounds | You can’t risk losing a low-abundance target |
A practical rule that saves time: if the band is barely above background in round one, stripping rarely “rescues” the experiment. It usually increases variability and makes the second round harder to interpret.
Quantitation note: Reprobing is best for adding a second readout or confirming changes. If you need publication-grade quantitation across multiple rounds, rerunning separate blots is typically more defensible than relying on many stripping cycles.
A stripping protocol only works when it removes antibodies without stripping away what you actually need—the immobilized protein. For that reason, the safest default is to start with milder stripping conditions and escalate only when you have evidence that antibodies remain. Many ghost band and background issues are not caused by “weak stripping,” but by incomplete removal of stripping reagents and antibody fragments during washing.
Bench note (scope): Stripping performance depends strongly on membrane type (PVDF vs nitrocellulose), detection chemistry (HRP/ECL vs fluorescence), and antibody affinity. Treat “mild vs harsh” as a range rather than a single recipe, and validate with the secondary-only check on your specific membrane + detection setup.
Table 2. Mild vs harsh western blot stripping: typical outcomes
| Approach | Best for | What can go wrong | What to adjust first |
|---|---|---|---|
| Mild stripping | Preserving signal; first attempt; sensitive targets | Residual antibodies → ghost bands | Improve wash exchanges; verify with secondary-only check; repeat stripping incrementally |
| Harsh stripping | Stubborn carryover after verification | Protein loss → weaker bands; surface stress → higher background | Shorten exposure; step down force; keep rounds limited |
The protocol below is designed to keep reprobing predictable. The key idea is that verification is part of the protocol—not an optional add-on.

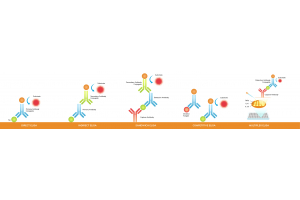
Verification-first workflow. Strip gently, wash thoroughly, then use a secondary-only check before re-probing. (Click to open full-size.)
Start with the mildest stripping condition that can remove bound antibodies. If you’re unsure, avoid defaulting to long incubations. Over-stripping can reduce recoverable signal and can also make background harder to control in later rounds.
Wash thoroughly in TBST (or your standard wash buffer). What matters most is not just wash time; it’s whether you are doing full solution exchanges to remove stripping reagents and any released antibody material. If you’re standardizing your workflow for consistency, your choice of buffers, substrates, membranes, and related essentials often lives in one place—your Western blot reagents setup.
What we mean by “buffer exchange”: replace the wash buffer with fresh TBST each time under agitation, rather than extending a single wash in the same buffer.
After stripping and washing, incubate the membrane with secondary antibody only (no primary), wash, then do a short exposure. This is the fastest, most reliable way to detect residual antibody signal before you invest in another full primary incubation.
Secondary-only check (operational definition): re-block the membrane, incubate with the same secondary used in round one (same species and detection chemistry), wash under the same rules, then take a short exposure that would have detected the original band. Use your round-one exposure as a reference point; the goal is to detect residual signal without overexposing the membrane. This check is only interpretable when the secondary and detection settings match what you used previously.
Table 3. Secondary-only check: how to confirm stripping worked
| What you see | Most likely meaning | What to do next |
|---|---|---|
| Clear bands (especially at prior target MW) | Antibody carryover or incomplete stripping | Increase TBST wash exchanges; repeat stripping incrementally; re-check |
| Diffuse haze / elevated background | Residual stripping reagent or insufficient re-blocking | Wash more thoroughly; re-block longer; lower secondary concentration |
| Clean image (no bands) | Membrane is ready for reprobing | Proceed to re-blocking and primary incubation |

Secondary-only check. Use the pattern to decide whether to wash more, strip again, or proceed to re-probing. (Click to open full-size.)
Re-blocking helps stabilize membrane surface behavior after stripping. When you re-probe, start with a validated antibody dilution rather than increasing concentration to “force” signal—on post-strip membranes, aggressive antibody concentrations often increase background faster than true signal.
Reprobing order tip: probe the most sensitive/low-abundance target first (before the membrane sees repeated processing), then reprobe higher-abundance targets or loading controls later. If phospho/total is your goal, phospho is typically probed first, then strip and probe total protein.
If your second round is aimed at a loading control, plan that choice deliberately. Many workflows rely on a stable loading control as the anchor for interpretation; for options that match your species and sample type, see Loading control antibodies. If your experiment depends on rigorous normalization across conditions, it also helps to align your strategy with Total protein normalization vs loading control antibodies before you decide which readout belongs in which round.
A realistic operating range is one to two reprobing rounds. Additional rounds can work, but signal loss and background drift become increasingly likely, especially for low-abundance targets.
When reprobing fails, the symptom usually points directly to the correct lever. Ghost bands indicate antibody carryover, which is best addressed by washing and verification before escalating stripping strength. Weak second-round signal points toward over-stripping and calls for milder conditions or shorter exposure. Background haze commonly reflects residue and membrane surface effects, so washing and re-blocking dominate the fix. For pattern matching and upstream checks, the Western blot troubleshooting library is often the fastest way to identify whether you’re seeing carryover, non-specific binding, or a transfer/sample issue that stripping won’t solve.
If your experiment requires multiple targets with defensible comparability, the “one membrane, many rounds” strategy often stops being efficient. In those cases, rerunning separate blots—or outsourcing a critical target to a Western blotting service workflow—can be faster than repeated stripping iterations, especially when sample is limited or the target is low-abundance.
A western blot stripping buffer removes bound antibodies (primary and/or secondary) from the membrane so the blot can be probed again for a different target.
A reliable protocol uses the mildest stripping condition that works, thorough TBST washes with full exchanges, and a secondary-only verification step before reprobing.
Use a secondary-only check after stripping. If bands remain, improve washing first and repeat stripping incrementally before reprobing.
High background is often caused by incomplete removal of stripping reagents, insufficient re-blocking, or overly concentrated antibod...

Dilution ratio describes a simple dilution – a unit volume of solute (or sample) is combined with a desired unit volume of solvent (or diluent), to reach a desired total volume (Vsolute + Vsolvent = Total Vsolution)
Thus, a dilution ratio of 1:4 describes 1 part solute + 4 parts solvent = 5 parts total. The sum of both solute plus solvent equals total, f...


High background in DAB staining usually shows up as one of three patterns: a global brown/gray haze, edge-darkening, or granular brown speckling. The fastest way to fix it is to stop guessing and first identify which layer is generating the background: tissue chemistry, primary binding, the HRP detection/amplification layer, or...

ELISA results can look “clean”—tight duplicates and a smooth standard curve—and still be misleading. In practice, the most common failure is not pipetting technique, but controls that do not isolate the specific failure mode (system background, non-specific binding, matrix interference, or out-of-range samples). If you want a broader setup framework before drilling into controls, Boster’s ELISA experimental design checklist is a useful companion read.
This post focuses on four controls that most reliably de-risk interpretation:

Microbial expression systems use engineered microbial organisms, such as bacteria or yeast, for the expression of antibody fragments quickly, efficiently, and at scale. By stripping away the complexities of mammalian cell culture, these systems can deliver functional proteins in days instead of weeks, making them a valuable complement to custom antibody production in mammalian systems. Formats like the Fab fragment, F(ab’)₂, scFv fragments, and VHH single-chain antibodies are particularly well-suited to microbial production because of their small size, simpler protein folding requirements, and lack of dependence on mammalian N-linked glycosylation. When Fc domain functions or full glycan structures are unnecessary, bacterial production in hosts like Escherichia coli or yeast secretory expression in Pichia pastoris offers a streamlined path from gene expression to purified reagent.
Antibody engineering has moved far beyond hybridoma technology and transgenic animal production. Today, recombinant protein production in microbial hosts provides a flexible and accessible option for generating high-quality antibody fragments. These truncated antibody molecules retain their antigen binding sites while omitting constant domains such as the Fc domain, reducing molecular weight and improving tissue penetration. This makes them highly valuable for diagnostics, targeted therapeutic proteins, and research tools.
Unlike mammalian cells or insect cell lines using the Baculovirus expression system, microbes like Escherichia coli grow rapidly, require inexpensive cell culture media, and can be genetically modified with precise recombinant DNA methods. For labs under tight deadlines, gene expression using Escherichia coli cells can turn a DNA sequence into a purified recombinant antibody fragment in a short timeframe. For those who need secretion and partial posttranslational changes, Pichia pastoris and Saccharomyces cerevisiae provide robust expression systems with secretion into the secretory pathway, simplifying recovery.
Choosing the right host involves balancing yield, protein expression quality, and downstream requirements. Each host type has specific advantages and limitations.
Escherichia coli is the most widely used Gram-negative bacteria for recombinant protein expression, particularly for scFv fragments, single-chain fragment variable formats, and Fab fragments. Its periplasmic expression pathway supports disulfide bonds crucial for antigen binding stability. For challenging constructs, molecular chaperones such as protein disulfide isomerase and other chaperone proteins can improve folding efficiency and reduce protein aggregation. While E. coli has limited glycosylation capabilities compared to mammalian, most antibody Fab fragments and fusion proteins do not require glycan modifications, making it ideal for bacterial production of non-glycosylated therapeutic proteins.
Pichia pastoris and Saccharomyces cerevisiae are leading yeast expression systems for antibody fragments that benefit from secretion. Pichia pastoris offers high-density fermentation and yeast secretory expression into the culture medium, easing purification. It can add simple glycans via its glycosylation machinery, though these differ from mammalian glycosylation sites. Glycoengineered Pichia pastoris strains can be used when partial glycosylation pathways are desirable. Saccharomyces cerevisiae is less common for high-titer production but offers well-developed strain engineering tools and synthetic inducible promoters for controlled gene expression.
Specialty systems like Bacillus subtilis can secrete proteins directly into the medium and are naturally free of endotoxins, making them attractive for sensitive diagnostic applications. Filamentous fungi are valued for their ability to support complex protein folding and post-translational modifications, but in recombinant protein production they remain less widely adopted than hosts like E. coli and Pichia pastoris, partly due to slower growth and historically fewer advanced genetic engineering tools—ongoing developments are reducing these limitations.
Despite differences in host biology, microbial production follows a predictable sequence.
The workflow begins with obtaining DNA constructs encoding the target fragment, sourced from hybridoma technology, phage display libraries, or synthetic gene design. These sequences are inserted into expression vectors tailored to the host organism’s codon usage and optimized to avoid unfavorable mRNA secondary structures. Vectors typically include strong promoters, secretion signal peptides for yeast-based systems, and affinity tags to facilitate purification. For Escherichia coli, the T7 promoter is widely used, whereas in Pichia pastoris, the AOX1 promoter enables methanol-inducible expression.
Once the vector is ready, it is introduced into the host cells—commonly via chemical transformation or electroporation in E. coli and electroporation in P. pastoris. Gene expression is then induced under host-specific conditions: isopropyl β-D-1-thiogalactopyranoside (IPTG) induction in E. coli or methanol feeding in Pichia. Throughout this stage, fermentation parameters such as temperature, pH, and dissolved oxygen are closely monitored to support optimal protein yield.
Proper folding is essential for preserving antigen-binding activity. In E. coli, directing expression to the periplasm facilitates disulfide bond formation, while co-expression with molecular chaperones can reduce aggregation. In yeast systems, secretion through the endoplasmic reticulum exposes the protein to endogenous chaperones, promoting correct folding and post-translational modifications.
Scaling up production requires fine-tuning fermentation strategies. In E. coli, fed-batch fermentation maintains high cell densities and consistent productivity. In P. pastoris, managing the methanol utilization pathway is critical, as excessive methanol can cause stress and reduce yield. Across both systems, minimizing cellular stress is key to sustaining performance.
Downstream processing often begins with affinity chromatography—commonly using His-tags, Protein L, or antigen-specific ligands—to isolate the antibody fragment from the culture medium. This is followed by polishing steps such as ion-exchange or size-exclusion chromatography to remove host cell contaminants. For bacterial systems, additional endotoxin removal steps are required to meet therapeutic-grade standards.
The final stage verifies that the product meets functional and regulatory requirements. Analytical assessments include SDS-PAGE for purity, mass spectrometry for identity, and binding assays such as ELISA or Western blot for functional performance. Stability testing ensures that the antibody fragment maintains its activity over time, supporting consistent therapeutic or diagnostic application.
Microbial expression systems enable the production of antibody fragments for a range of uses, spanning diagnostics, therapeutics, and research.
In assays such as ELISA, lateral flow devices, and biosensors, smaller antibody fragments can be densely immobilized on detection surfaces, enhancing signal sensitivity. Microbial production offers a rapid, cost-effective supply for these applications.
In the early days of custom antibody production, scientists explored various animal cell culture technology platforms to identify the ideal system
Growing demand for high-quality antibodies in therapeutics, diagnostics, and research is pushing innovation beyond traditional hybridoma technology and phage display methods. Single B cell antibody discovery addresses this need by enabling the direct isolation of antigen-specific B cells from immunized or naturally exposed subjects while preserving the native pairing of heavy and light chains, an approach that complements custom antibody production. This capability allows for the rapid generation of functional antibodies with greater diversity, including those targeting molecules that are difficult to address using conventional techniques.
Single B cell antibody discovery is a high-resolution single B cell screening technique that identifies and clones antibody sequences... from individual B cells. By isolating single antibody-secreting B cells and sequencing
Multiplex immunofluorescence (multiplex IF) rarely fails because you “missed a step.” It fails because you can’t reliably separate bleed-through, background, and true signal—and you don’t have a fast way to prove what’s actually happening.
Most multiplex problems are solved faster when you diagnose first: run the minimum controls, apply a few quick checks, then change the right lever in the right order. If you’re new to IF terminology, start here: immunofluorescence glossary. If you need a step-by-step workflow reference, use this resource (this post won’t repeat it): IHC/ICC/IF protocol resource.
To troubleshoot multiplex IF quickly: (1) run single-stain controls and view each single stain across all channels to detect bleed-through, (2) run a no-primary control to identify system/sample background, (3) check for saturation in any channel, and (4) optimize each channel for best signal-to-background—but keep settings consistent within the same channel when comparing conditions. Then adjust only one staining variable at a time.
Most multiplex issues fall into one (or more) of these patterns:
When you see these, don’t change everything. Start by proving what kind of problem it is.
You don’t need a dozen controls. You need the right ones.
What it is: Stain each target one at a time, using the same imaging settings you plan to use for multiplex.
What it tells you:
Use it like this (quick):
What it is: Run the full workflow without primary antibodies.
What it tells you:
What it is: Image only the brightest marker (or brightest single-stain) at the exposures you’re using for multiplex.
What it tells you:
Optional: Isotype control—useful when you suspect non-specific binding and your no-primary control is clean but staining still looks wrong. Don’t default to it as a first-line control.
| Quick check | When you’ll see it | Do this (fast) | What it means | Fix first |
|---|---|---|---|---|
| A) Saturation check | “Co-localization everywhere”, flat/glowy signal | Look for clipped highlights (max intensity) in any channel | Saturation can create false positives and fake overlap | Lower exposure/gain on the saturated channel before anything else |
| B) Cross-channel leak check (single-stain scan) | Signal shows up in multiple channels | View a single-stain image across all channels using multiplex settings | Spillover/bleed-through or detection cross-talk (not biology) | Reduce bright-channel exposure and rebalance signal; verify again with single-stain |
| C) Background source check (no-primary) | Haze/grain, especially in one channel | Compare no-primary to multiplex using the same display scaling | Background is system/sample/detection-driven | Tighten wash consistency; reduce non-specific signal sources; check detection/secondary behavior |
| D) Exposure consistency check | Overlap appears/disappears when brightness changes | Set each channel independently for clean signal-to-background, but keep the same settings within each channel when comparing conditions; avoid “auto” adjustments. | Imaging settings are driving the interpretation | Keep per-channel settings consistent for comparisons; re-evaluate overlap after settings are standardized. |
Rule of thumb: Fix imaging QC (saturation + per-channel exposure rules) before changing staining variables.
When multiplex looks wrong, apply fixes in this order (least effort → biggest impact):
Further reading (no overlap with this post): How to Choose Fluorophores for Multiplex IF. If what you’re seeing looks like tissue autofluorescence (broad, structure-like background), use this guide: 5 Tips to Reduce Autofluorescence.
| What |
|---|