This website uses cookies to ensure you get the best experience on our website.
- Table of Contents
When an IHC slide looks weak or unexpectedly blank, start with the stain—not the antibody.
Weak or no staining in IHC usually points to one of four places: the sample, antigen retrieval, primary antibody conditions, or the detection layer. The antibody may still be the issue, but it should not be the first assumption.
That is the practical value of troubleshooting in order. If the tissue is a poor positive context, no amount of optimization will rescue the result. If the epitope is still masked, the antibody may never get a fair chance to bind. If the primary conditions are too mild, the stain may stay faint even when binding is specific. And if the detection layer is not converting binding into visible signal, a real interaction can still look negative.
This article focuses on one symptom: a slide that looks weak, unexpectedly clean, or blank. It is not a full IHC protocol. It is a shorter troubleshooting path for readers who need to decide what to check first before changing too many variables. For a broader refresher on staining logic, see Immunohistochemistry IHC Principle.
Start with the tissue, not the reagent.
A weak stain does not always mean the assay failed. Sometimes the tissue is simply a poor positive context for the target. Expression may be low, focal, region-specific, treatment-dependent, or limited to a small cell population. In those cases, a faint result may reflect biology more than technique.
This is also where morphology can be misleading. A section can look structurally fine and still stain poorly. Good architecture does not guarantee good antigen detectability. Delayed fixation, over-fixation, uneven processing, and inconsistent storage history can all reduce usable signal without making the slide look obviously damaged. If sample handling may be part of the problem, review your cell or tissue fixation approach first.
A more useful question is this: should this sample clearly be positive enough to test the assay? If the answer is uncertain, then weak staining may not tell you very much yet. Positive context matters for the same reason. If a known positive tissue, or at least an internal positive region, shows no convincing signal, the problem is more likely technical than biological. If you need a quick refresher on this logic, review How to Design Positive and Negative Controls for IHC.
Yes. In FFPE workflows, it is one of the first places to look.
If the sample should be positive but the slide stays faint or blank, retrieval may be the bottleneck. Formalin fixation can preserve morphology while still masking the epitope enough to suppress visible staining. That is why a technically neat slide can still give a biologically empty-looking result.
The mistake here is to think only in extremes. Retrieval is not just present or absent. It can also be present but mismatched. A condition that works for one marker may be too mild for another. A setup that performs well in one tissue type may not work equally well in another. A clean slide with little signal does not rule retrieval out. If retrieval looks suspicious, revisit your antigen retrieval strategy and compare it with HIER vs PIER.
Because validation does not override assay conditions.
A validated antibody can still produce weak staining if the working dilution is too conservative, the incubation is too short, or the temperature does not support strong enough binding for that target in that workflow. This is one of the easiest places to over-trust the product label and under-check the actual assay setup.
One especially useful clue is this: a weak but clean stain usually points to optimization before replacement. If the slide is faint but not obviously messy, the primary antibody may still be binding specifically. The problem may be that the current conditions are simply too mild to convert that binding into a convincing result. If the stain is weak but the workflow is otherwise stable, go back to the broader IHC protocol before replacing the reagent.
Absolutely.
Not every weak stain is a primary binding problem. Sometimes the primary antibody binds, but the downstream system never turns that binding into a strong enough visible readout. A workflow that performed well before may weaken after a reagent substitution. A secondary antibody may not match the primary setup correctly. A low-abundance target may need more downstream sensitivity than the current detection chemistry can provide. A chromogen may simply be underdeveloped enough to make a real signal look absent.
If the sample should be positive, retrieval looks plausible, and the primary conditions are not obviously too mild, the detection layer deserves real suspicion. For broader assay-level failure patterns, see the full IHC Troubleshooting guide.
When a slide is weak or blank, the instinct is often to rewrite the whole workflow. That usually creates more confusion than clarity.
A better approach is to make the troubleshooting order explicit.

High background in DAB staining usually shows up as one of three patterns: a global brown/gray haze, edge-darkening, or granular brown speckling. The fastest way to fix it is to stop guessing and first identify which layer is generating the background: tissue chemistry, primary binding, the HRP detection/amplification layer, or...

Multiplex immunofluorescence (multiplex IF) rarely fails because you “missed a step.” It fails because you can’t reliably separate bleed-through, background, and true signal—and you don’t have a fast way to prove what’s actually happening.
Most multiplex problems are solved faster when you diagnose first: run the minimum controls, apply a few quick checks, then change the right lever in the right order. If you’re new to IF terminology, start here: immunofluorescence glossary. If you need a step-by-step workflow reference, use this resource (this post won’t repeat it): IHC/ICC/IF protocol resource.
To troubleshoot multiplex IF quickly: (1) run single-stain controls and view each single stain across all channels to detect bleed-through, (2) run a no-primary control to identify system/sample background, (3) check for saturation in any channel, and (4) optimize each channel for best signal-to-background—but keep settings consistent within the same channel when comparing conditions. Then adjust only one staining variable at a time.
Most multiplex issues fall into one (or more) of these patterns:
When you see these, don’t change everything. Start by proving what kind of problem it is.
You don’t need a dozen controls. You need the right ones.
What it is: Stain each target one at a time, using the same imaging settings you plan to use for multiplex.
What it tells you:
Use it like this (quick):
What it is: Run the full workflow without primary antibodies.
What it tells you:
What it is: Image only the brightest marker (or brightest single-stain) at the exposures you’re using for multiplex.
What it tells you:
Optional: Isotype control—useful when you suspect non-specific binding and your no-primary control is clean but staining still looks wrong. Don’t default to it as a first-line control.
| Quick check | When you’ll see it | Do this (fast) | What it means | Fix first |
|---|---|---|---|---|
| A) Saturation check | “Co-localization everywhere”, flat/glowy signal | Look for clipped highlights (max intensity) in any channel | Saturation can create false positives and fake overlap | Lower exposure/gain on the saturated channel before anything else |
| B) Cross-channel leak check (single-stain scan) | Signal shows up in multiple channels | View a single-stain image across all channels using multiplex settings | Spillover/bleed-through or detection cross-talk (not biology) | Reduce bright-channel exposure and rebalance signal; verify again with single-stain |
| C) Background source check (no-primary) | Haze/grain, especially in one channel | Compare no-primary to multiplex using the same display scaling | Background is system/sample/detection-driven | Tighten wash consistency; reduce non-specific signal sources; check detection/secondary behavior |
| D) Exposure consistency check | Overlap appears/disappears when brightness changes | Set each channel independently for clean signal-to-background, but keep the same settings within each channel when comparing conditions; avoid “auto” adjustments. | Imaging settings are driving the interpretation | Keep per-channel settings consistent for comparisons; re-evaluate overlap after settings are standardized. |
Rule of thumb: Fix imaging QC (saturation + per-channel exposure rules) before changing staining variables.
When multiplex looks wrong, apply fixes in this order (least effort → biggest impact):
Further reading (no overlap with this post): How to Choose Fluorophores for Multiplex IF. If what you’re seeing looks like tissue autofluorescence (broad, structure-like background), use this guide: 5 Tips to Reduce Autofluorescence.
| What |
|---|

Multiplex immunofluorescence, or multiplex IF, often looks “simple” on paper—until channels start bleeding into each other, weak targets disappear, or background forces you to crank exposure. In reality, most multiplex failures come from three upstream issues: channel planning, where brightness is mismatched to abundance, overlap, including spectral spillover and crosstalk, and missing controls, meaning no single-stain proof. The goal is not “more color,” but clean, interpretable signal with defensible imaging rules—so your colocalization reflects biology, not artifacts.
This post is a practical workflow for fluorophore selection in multiplex IF: plan channels by abundance, prevent bleed-through, and validate with controls. It’s written as a microscope-side SOP—decision rules plus checks—not a fundamentals-only overview. If you want to align upstream variables first, start here: sample preparation for IHC/ICC/IF and cell/tissue fixation.
To choose fluorophores for multiplex immunofluorescence and prevent bleed-through, (1) assign the brightest channel to the lowest-abundance target, (2) keep channels spectrally separated, (3) verify spillover with single-stain controls, and (4) optimize imaging settings per channel, then keep them constant within the same channel for any group/sample comparisons.
To make the intent clear: this post is a multiplex IF workflow—channel planning, single-stain spillover checks, and within-channel imaging consistency for comparisons. For fundamentals—what a fluorophore is, spectra basics, and selection basics— see how to choose the right fluorophore...


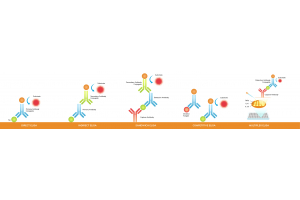
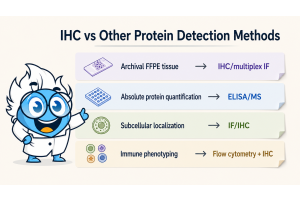
Immunohistochemistry (IHC) is a vital technique in biomedical research and clinical diagnostics, enabling the visualization and localization of specific proteins within tissue samples. In this blog, we outline the different types of IHC staining, including direct and indirect...